Quantcast
Channel: GUI – Undocumented Matlab
Viewing all 75 articles
Browse latest View live

Adding custom properties to GUI objects

$
0
0

Matlab objects have numerous built-in properties (some of them publicly-accessible/documented and others not, but that’s a different story). For various purposes, it is sometimes useful to attach custom user-defined properties to such objects. While there was never a fully-documented way to do this, most users simply attached such properties as fields in the UserData property or the object’s [hidden] ApplicationData property (accessible via the documented setappdata/getappdata functions).

An undocumented way to attach actual new user-defined properties to objects such as GUI handles or Java references has historically (in HG1, up to R2014a) been to use the undocumented schema.prop function, as I explained here. As I wrote in that post, in HG2 (R2014b onward), we can use the fully-documented addprop function to add new custom properties (and methods) to such objects. What is still NOT documented, as far as I could tell, is that all of Matlab’s builtin handle graphics objects indirectly inherit the dynamicprops class, which allows this. The bottom line is that we can dynamically add custom properties in run-time to any HG object, without affecting any other object. In other words, the new properties will only be added to the handles that we specifically request, and not to any others.

All this is important, because for some unexplained reason that escapes my understanding, MathWorks chose to seal its classes, thus preventing users to extend them with sub-classes that contain the new properties. So much frustration could have been solved if MathWorks would simply remove the Sealed class meta-property from its classes. Then again, I’d have less to blog about in that case…

Anyway, why am I rehashing old news that I have already reported a few years ago?

Well, first, because my experience has been that this little tidbit is [still] fairly unknown by Matlab developers. Secondly, I happened to run into a perfect usage example a short while ago that called for this solution: a StackExchange user asked whether it is possible to tell a GUI figure’s age, in other words the elapsed time since the figure was created. The simple answer would be to use setappdata with the creation date whenever we create a figure. However, a “cleaner” approach seems to be to create new read-only properties for the figure’s CreationTime and Age:

First, create a small Matlab function as follows, that attaches the CreationTime property to a figure:

function setCreationTime(hFig,varargin)
   hProp = addprop(hFig,'CreationTime');
   hFig.CreationTime = now;
   hProp.SetAccess = 'private';  % make property read-only after setting its initial value
 
   hProp = addprop(hFig,'Age');
   hProp.GetMethod = @(h,e) etime(datevec(hFig.CreationTime), clock);  % compute on-the-fly
   hProp.SetAccess = 'private';  % make property read-only
end

Now assign this function as the default CreateFcn callback function for all new figures from now on:

set(0,'DefaultFigureCreateFcn',@setCreationTime)

That’s it – you’re done! Whenever a new figure will be created from now on, it will have two custom read-only properties: CreationTime and Age.

For example:

>> newFig = figure;
>> newFig.CreationTime
ans =
      737096.613706748
 
>> ageInDays = now - newFig.CreationTime
ageInDays = 
       0.0162507836846635
>> ageDuration = duration(ageInDays*24,0,0)
ageDuration = 
  duration
   00:23:24
>> ageString = datestr(ageInDays, 'HH:MM:SS.FFF')
ageString = 
    '00:23:24.068'
 
>> ageInSecs = newFig.Age
ageInSecs =
       1404.06771035492

Note that an alternative way to set the computed property Age would have been to set its value to be an anonymous function, but this would have necessitated invoking it with parenthesis (as in: ageInSecs = newFig.Age()). By setting the property’s GetMethod meta-property we avoid this need.

Keen readers will have noticed that the mechanism that I outlined above for the Age property/method can also be used to add custom user methods. For example, we can create a new custom property named refresh that would be read-only and have a GetMethod which is the function handle of the function that refreshes the object in some way.

Do you have any special uses for custom user-defined properties/methods in your program? or perhaps you have a use-case that might show MathWorks why sub-classing the built-in classes might improve your work? if so, then please place a comment about it below. If enough users show MathWorks why this is important, then maybe it will be fixed in some future release.


Sliders in Matlab GUI – part 2

$
0
0

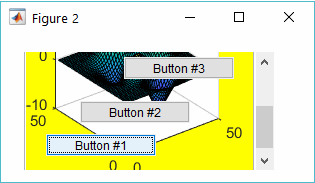
Exactly 3 years ago I posted about various alternatives for embedding sliders in Matlab GUI. Today I will follow up on that post with a description of yet another undocumented builtin alternative – controllib.widget.Slider. A summary of the various alternatives can be seen in the following screenshot:

Slider alternatives in Matlab GUI

Slider alternatives in Matlab GUI

The controllib.widget.Slider component is a class in Matlab’s internal controllib package (last week I discussed a different utility function in this package, controllib.internal.util.hString2Char).

controllib.widget.Slider accepts 3 input arguments: containing figure handle, position in pixels, and data values. For example:

>> hSlider = controllib.widget.Slider(gcf, [10,10,100,50], 5:25)
hSlider = 
  Slider with properties:
 
        Data: [6 7 8 9 10 11 12 13 14 15 16 17 18 19 20 21 22 23 24 25]
       Index: 11
       Value: 15
    FontSize: 8
    Position: [10 10 100 50]

This creates an invisible axes at the specified figure location and displays graphic axes objects that provide the appearance of the slider. When you move the slider’s knob, or click its centerline or arrows (“Steppers”), the slider’s value changes accordingly.

You can attach a callback function to the slider as follows:

myCallback = @(h,e) disp(h.Value);  % as an example
addlistener(hSlider, 'ValueChanged', myCallback);

Note that controllib.widget.Slider is based on pure-Matlab code and fully-supported functionality. The Matlab source code is available (%matlabroot%/toolbox/shared/controllib/graphics/+controllib/+widget/Slider.m) and quite readable. So while it does not actually work with the new web-based uifigures, is should be relatively easy to adapt the code so that this component could be displayed in such uifigures.

Below is a script to recreate the screenshot above. Note the two alternative mechanisms for setting properties (Java setter-method notation, and HG set notation):

hFig = figure('Color','w');
 
% 1. controllib.widget.Slider
hSlider1 = controllib.widget.Slider(hFig, [10,10,100,50], 1:20);
hSlider1.Value = 12;
 
% 2. uicontrol
hSlider2 = uicontrol('style','slider', 'units','pixels', 'pos',[10,80,100,20], 'Min',0', 'Max',20, 'Value',12);
 
% 3. JScrollBar
jSlider3 = javaObjectEDT(javax.swing.JScrollBar);
jSlider3.setOrientation(jSlider3.HORIZONTAL);  % Java setter-method notation
set(jSlider3, 'VisibleAmount',1, 'Minimum',0, 'Maximum',20, 'Value',12);  % HG set notation
[hSlider3, hContainer3] = javacomponent(jSlider3, [10,130,100,20], hFig);
 
% 4. JSlider #1
jSlider4 = javaObjectEDT(javax.swing.JSlider(0,20,12))
jSlider4.setBackground(java.awt.Color.white);  % Java setter-method notation
set(jSlider4, 'MinorTickSpacing',1, 'MajorTickSpacing',4, 'SnapToTicks',true, 'PaintLabels',true);  % HG set notation
[hSlider4, hContainer4] = javacomponent(jSlider4, [10,180,100,30], hFig);
 
% 5. JSlider #2
jSlider5 = javaObjectEDT(javax.swing.JSlider(0,20,12))
jSlider5.setBackground(java.awt.Color.white);  % Java setter-method notation
jSlider5.setPaintTicks(true);
set(jSlider5, 'MinorTickSpacing',1, 'MajorTickSpacing',4, 'SnapToTicks',true, 'PaintLabels',true);  % HG set notation
[hSlider5, hContainer5] = javacomponent(jSlider5, [10,230,100,40], hFig);

For additional details regarding the other slider alternatives, please refer to my earlier post on this subject.

Have you ever used another interesting utility or class in Matlab’s builtin packages? If so, please tell us about it in a comment below.

Scrollable GUI panels

$
0
0

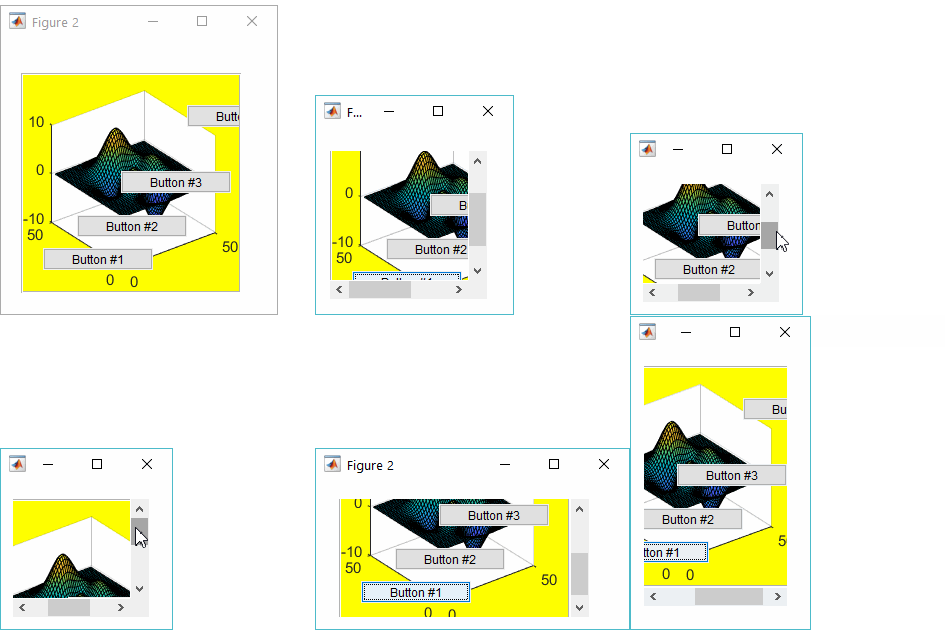
Matlab enables two types of GUI container types, via the Units property: fixed-size ('pixels', 'chars', etc.) and flexible ('normalized'). In many cases, we need something in between: a panel that expands dynamically when its container grows (i.e., flexible/normalized), and displays scroll-bars when the container shrinks (i.e., fixed size, with a scrollable viewport). This functionality is relatively easy to achieve using a bit of undocumented magic powder. Today’s post will show how to do this with legacy (Java-based) figures, and next week’s post will do the same for web-based (JavaScript) uifigures.

Scrollable Matlab GUI panel

Technical description

The basic idea is that in HG2 (Matlab release R2014b onward), uipanels are implemented using standard Java JPanel components. This enables all sorts of interesting customizations. For the purposes of today’s discussion, the important thing to note is that the underlying JPanel object can be re-parented to reside inside a Java JScrollPanel.

So, the idea is to get the Matlab panel’s underlying JPanel object reference, then embed it within a new JScrollPanel object that is placed at the exact same GUI coordinates as the original panel. The essential Matlab code snippet is this:

% Create the Matlab uipanel in the GUI
hPanel = uipanel(...); drawnow
 
% Get the panel's underlying JPanel object reference
jPanel = hPanel.JavaFrame.getGUIDEView.getParent;
 
% Embed the JPanel within a new JScrollPanel object
jScrollPanel = javaObjectEDT(javax.swing.JScrollPane(jPanel));
 
% Remove the JScrollPane border-line
jScrollPanel.setBorder([]);
 
% Place the JScrollPanel in same GUI location as the original panel
pixelpos = getpixelposition(hPanel);
hParent = hPanel.Parent;
[hjScrollPanel, hScrollPanel] = javacomponent(jScrollPanel, pixelpos, hParent);
hScrollPanel.Units = 'norm';
 
% Ensure that the scroll-panel and contained panel have linked visibility
hLink = linkprop([hPanel,hScrollPanel],'Visible');
setappdata(hPanel,'ScrollPanelVisibilityLink',hLink);

Note that this code will only work with panels created in legacy figures, not web-based uifigures (as I mentioned above, a similar solution for uifigures will be presented here next week).

Also note that the new scroll-panel is created with javaObjectEDT, in order to avoid EDT synchronization problems

We also want to link the visibility of the scroll-panel and its contained Matlab panel (hPanel), so that when the panel is set to be non-visible (hPanel.Visible='off'), the entire scroll-panel (scrollbars included) will become invisible, and vice-versa. We can do this by linking the Visible property of the Matlab panel and the scroll-panel container (hScrollPanel) using the linkprop function at the bottom of the script above. Note that we must persist the resulting hLink otherwise it becomes defunct – this is done by using setappdata to store the link in the panel (this way, when the panel is deleted, so does the link).

Resizing the container

The scroll-panel is created with a specific pixelpos location and size, and then its container is made to have normalized units. This ensures that when the container (hParent) grows, the scroll-panel grows as well, and no scrollbars appear (since they are not needed). But when the container shrinks in the X and/or Y direction, corresponding scrollbars appear as-needed. It sounds complicated, but it’s actually very intuitive, as the animated image above shows.

When the container resizes, the displayed viewport image may “jump” sideways. To fix this we can attach a simple repaint callback function to the scroll-panel’s SizeChangedFcn property:

% Attach a repaint callback function
hScrollPanel.SizeChangedFcn = @repaintScrollPane;
 
% Define the callback function:
function repaintScrollPane(hScrollPanel, varargin)
    drawnow
    jScrollPanel = hScrollPanel.JavaPeer;
    offsetX = 0; %or: jScrollPanel.getHorizontalScrollBar.getValue;
    offsetY = 0; %or: jScrollPanel.getVerticalScrollBar.getValue;
    jOffsetPoint = java.awt.Point(offsetX, offsetY);
    jViewport = jScrollPanel.getViewport;
    jViewport.setViewPosition(jOffsetPoint);
    jScrollPanel.repaint;
end

Scrollbars automatically appear as-needed during resize

Scrollbars automatically appear as-needed during resize

Viewport position/offset

It would be convenient to have an easy-to-use ViewOffset property in the hScrollPanel object, in order to be able to programmatically query and set the current viewport position (i.e., scrollbars offset). We can add this property via the addprop function:

% Add a new Viewoffset property to hSCrollPanel object
hProp = addprop(hScrollPanel, 'ViewOffset');
hProp.GetMethod = @getViewOffset;  %viewOffset = getViewOffset(hScrollPanel)
hProp.SetMethod = @setViewOffset;  %setViewOffset(hScrollPanel, viewOffset)
 
% Getter method for the dynamic ViewOffset property
function viewOffset = getViewOffset(hScrollPanel, varargin)
    jScrollPanel = hScrollPanel.JavaPeer;
    jPoint = jScrollPanel.getViewport.getViewPosition;
    viewOffset = [jPoint.getX, jPoint.getY];
end
 
% Setter method for the dynamic ViewOffset property
function setViewOffset(hScrollPanel, viewOffset)
    jPoint = java.awt.Point(viewOffset(1), viewOffset(2));
    jScrollPanel = hScrollPanel.JavaPeer;
    jScrollPanel.getViewport.setViewPosition(jPoint);
    jScrollPanel.repaint;
end

This enables us to both query and update the scroll-panel’s view position – [0,0] means top-left corner (i.e., no scroll); [12,34] mean scrolling 12 to the right and 34 down:

>> offset = hScrollPanel.ViewOffset   % or: get(hScrollPanel,'ViewOffset')
offset = 
     0     0
 
>> offset = hScrollPanel.ViewOffset   % or: get(hScrollPanel,'ViewOffset')
offset = 
    12    34
 
% Scroll 30 pixels right, 50 pixels down
>> hScrollPanel.ViewOffset = [30,50];   % or: set(hScrollPanel,'ViewOffset',[30,50])

attachScrollPanelTo utility

I have prepared a utility called attachScrollPanelTo (downloadable from the Matlab File Exchange), which encapsulates all of the above, plus a few other features: inputs validation, Viewport property in the output scroll-pane object, automatic encasing in a new panel for input object that are not already a panel, etc. Feel free to download the utility, use it in your program, and modify the source-code to fit your needs. Here are some usage examples:

attachScrollPanelTo();  % display the demo
 
attachScrollPanelTo(hPanel) % place the specified hPanel in a scroll-panel
 
hScroll = attachScrollPanelTo(hPanel);
hScroll.ViewOffset = [30,50];  % set viewport offset (30px right, 50px down)
set(hScroll, 'ViewOffset',[30,50]);  % equivalent alternative

If you’d like me to add flare to your Matlab GUI, don’t hesitate to contact me on my Consulting page.

Customizing web-GUI uipanel

$
0
0

I would like to introduce guest blogger Khris Griffis. Today, Khris will continue the series of posts on web-based uifigure customization with an article showing how to create scrollable/customizable panels in web-based uifigures. This post follows last-week’s article, about placing controls/axes within a scroll-panel in non-web (Java-based) figures. Users interested in advanced aspects and insights on the development roadmap of web-based Matlab GUI should also read Loren Shure’s blog post from last week.

Motivation

As a retinal physiologist, I spend a lot of time in Matlab creating GUIs to visualize and analyze electrophysiological data. The data often requires a lot of processing and quality control checks before it can be used for interpretation and publication. Consequently, I end up with many control elements taking up precious space on my GUI.

In Java-based (legacy/GUIDE) figures, this wasn’t a huge problem because, depending on what GUI components I needed, I could use a pure Matlab approach (a child panel within a parent panel, with a couple of control sliders moving the child panel around), or a number of Java approaches (which are always more fun; Yair described such an approach last week).

Unfortunately, the web-based (App-Designer) figure framework doesn’t support Java, and the pure/documented Matlab approach just doesn’t look good or function very well:

AppDesigner uislider is not a good scrollbar, no matter what we do to it!

Fortunately, the new web framework allows us to use HTML, CSS and JavaScript (JS) to modify elements in the uifigure, i.e. its web-page DOM. It turns out that the uipanel object is essentially just a <div> with a Matlab-designed CSS style. We can customize it with little effort.

The main goal here is to create a scrollable customizable uipanel containing many uicontrol elements, which could look something like this:

Running app demo

A simple command-window example

Since we are building on the series of uifigure customizations, I expect you have already read the preceding related Undocumented Matlab posts:

  1. Customizing uifigures part 1
  2. Customizing uifigures part 2
  3. Customizing uifigures part 3

Also, I highly recommend cloning (or at least downloading) the mlapptools toolbox repo on Github (thanks Iliya Romm et al.). We will use it to simplify life today.

Using the mlapptools toolbox, we need just a few lines of code to set up a scrollable panel. The important thing is knowing how big the panel needs to be to hold all of our control objects. Once we know this, we simply set the panel’s Position property accordingly. Then we can use simple CSS to display scrollbars and define the viewing dimensions.

For example, if we need 260px in width by 720px in height to hold our control widgets, but only have 200px height available, we can solve this problem in 3 steps:

  1. Set the uipanel‘s Dimension property to be 260px wide by 720px tall.
  2. Set the viewing height using mlapptools.setStyle(scrollPane,'height','200px') for the panel’s CSS height style attribute.
  3. Display the vertical scrollbar by calling mlapptools.setStyle(scrollPane,'overflow-y','scroll') for the panel’s CSS overflow-y='scroll' style attribute.
% Create the figure
fig = uifigure('Name', 'Scroll Panel Test');
 
% Place a uipanel on the figure, color it for fun
scrollPane = uipanel(fig, 'BackgroundColor', [0.5,0.4,1]);
 
% Define the space requirements for the controls
totalWidth  = 260; %px
totalHeight = 720; %px
viewHeight  = 200; %px
 
% STEP 1: set the uipanel's Position property to the required dimensions
scrollPane.Position(3) = totalWidth;  % WIDTH
scrollPane.Position(4) = totalHeight; % HEIGHT
 
% STEP 2: set the viewing height
mlapptools.setStyle(scrollPane, 'height', sprintf('%dpx', viewHeight));
 
% STEP 3: display the vertical scrollbar
mlapptools.setStyle(scrollPane, 'overflow-y', 'scroll');
 
% Add control elements into the uipanel
...

Example scrollable uipanel in a Matlab uifigure

Because this is a web-based GUI, notice that you can simply hover your mouse over the panel and scroll with your scroll wheel. Awesome, right?

Note that the CSS height/width style attributes don’t affect the actual size of our panel, just how much of the panel we can see at once (“viewport”).

The CSS overflow style attribute has a number of options. For example, setStyle(scrollPane,'overflow','auto') causes scrollbars to automatically hide when the viewing area is larger than panel’s dimensions. Review the CSS overflow attribute to learn about other related settings that affect the panel’s behavior.

Styling the scrollbars

The mlapptools toolbox utilizes dojo.js to query the DOM and set styles, which is essentially setting inline styles on the DOM element, i.e. <div ... style="color: red;background:#FEFEFE;..."> ... </div>. This has the added benefit of overriding any CSS classes Matlab is imposing on the DOM (see CSS precedence). We can inject our own classes into the page’s <head> tag and then use dojo.setClass() to apply our classes to specific GUI elements. For example, we can style our bland scrollbars by using CSS to define a custom scrollpane style class:

/* CSS To stylize the scrollbar */
.scrollpane::-webkit-scrollbar {
  width: 20px;
}
/* Track */
.scrollpane::-webkit-scrollbar-track {
  background-color: white;
  box-shadow: inset 0 0 5px white;
  border-radius: 10px;
}
/* Handle */
.scrollpane::-webkit-scrollbar-thumb {
  background: red;
  border-radius: 10px;
}
/* Handle on hover */
.scrollpane::-webkit-scrollbar-thumb:hover {
  background: #b30000;
}

To get the CSS into the document header, we need to first convert (“stringify”) it in Matlab:

% CSS styles 'stringified' for MATLAB
%  note that the whole style tag is wrapped in single quotes, that is required!
%  i.e. '<style>...</style>' which prints to the command window as:
%   ''<style>...</style>''
cssText = [...
  '''<style>\n', ...
  '  .scrollpane::-webkit-scrollbar {\n', ...
  '    width: 20px;\n', ...
  '  }\n', ...
  '  /* Track */\n', ...
  '  .scrollpane::-webkit-scrollbar-track {\n', ...
  '    background-color: white;\n', ...
  '    box-shadow: inset 0 0 5px white;\n', ...
  '    border-radius: 10px;\n', ...
  '  }\n', ...
  '  /* Handle */\n', ...
  '  .scrollpane::-webkit-scrollbar-thumb {\n', ...
  '    background: red; \n', ...
  '    border-radius: 10px;\n', ...
  '  }\n', ...
  '  /* Handle on hover */\n', ...
  '  .scrollpane::-webkit-scrollbar-thumb:hover {\n', ...
  '    background: #b30000; \n', ...
  '  }\n', ...
  '</style>''' ...
  ];

As explained in Customizing uifigures part 1, we can execute JavaScript (JS) commands through the webWindow object. To simplify it, we use the method from Customizing uifigures part 2 to obtain the webWindow object for our GUI window and and use the executeJS() method to add our HTML into the document’s <head> tag. It is worth checking out the properties and methods of the JS document object.

% get the webWindow object
webWindow = mlapptools.getWebWindow(fig);
 
% inject the CSS
webWindow.executeJS(['document.head.innerHTML += ',cssText]);

Now the tricky part is that we have to assign our new CSS scrollpane class to our uipanel. We need 2 things: the webWindow object and the data-tag (our panel’s unique ID) attribute.

% get the uipanel data-tag attr.
[webWindow, panelID] = mlapptools.getWebElements(scrollPane);
 
%make a dojo.js statement (use addClass method)
setClassString = sprintf(...
  'dojo.addClass(dojo.query("[%s = ''%s'']")[0], "%s")',...
  panelID.ID_attr, panelID.ID_val, 'scrollpane');
 
% add class to DOM element
webWindow.executeJS(setClassString);

The results of applying our scrollpane CSS style on our scroll-pane's scrollbars
The results of applying our scrollpane CSS style on our scroll-pane’s scrollbars

Note: Unfortunately, because of CSS precedence rules, we may have to use the dreaded !important CSS qualifier to get the desired effect. So if the result doesn’t match your expectations, try adding !important to the CSS class attributes.

Styling the uipanel

Each uipanel appears to be composed of 4 <div> HTML elements: a wrapper, internal container for the panel title, a separator, and the panel’s body (contents). We first use mlapptools.getWebElements() to get the data-tag ID for the wrapper node. We can then apply styles to the wrapper, or any child node, with CSS and JS.

For example, we can use CSS3 patterns (such as one in this CSS3 gallery) to liven up our panel. We can also use CSS to define a block element that will replace the title container with some static text. The CSS below would be appended to the cssText string we made for styling the scrollbars above:

/* DECORATE THE BACKGROUND */
/* Stars modified from: http://lea.verou.me/css3patterns/#stars */
.scrollpane {
  overflow: auto;
  background:
  linear-gradient(324deg, #232927 4%,   transparent 4%)   -70px 43px,
  linear-gradient( 36deg, #232927 4%,   transparent 4%)    30px 43px,
  linear-gradient( 72deg, #e3d7bf 8.5%, transparent 8.5%)  30px 43px,
  linear-gradient(288deg, #e3d7bf 8.5%, transparent 8.5%) -70px 43px,
  linear-gradient(216deg, #e3d7bf 7.5%, transparent 7.5%) -70px 23px,
  linear-gradient(144deg, #e3d7bf 7.5%, transparent 7.5%)  30px 23px,
  linear-gradient(324deg, #232927 4%,   transparent 4%)   -20px 93px,
  linear-gradient( 36deg, #232927 4%,   transparent 4%)    80px 93px,
  linear-gradient( 72deg, #e3d7bf 8.5%, transparent 8.5%)  80px 93px,
  linear-gradient(288deg, #e3d7bf 8.5%, transparent 8.5%) -20px 93px,
  linear-gradient(216deg, #e3d7bf 7.5%, transparent 7.5%) -20px 73px,
  linear-gradient(144deg, #e3d7bf 7.5%, transparent 7.5%)  80px 73px !important;
  background-color: #232977 !important;
  background-size: 100px 100px !important;
}
/* STYLES TO CENTER A TEXT BLOCK ON A WHITE SEMI-TRANSPARENT BACKGROUND BLOCK */
/* White block div */
.blockdiv {
  color: black;
  font: 25px Arial, sans-serif !important;
  background: rgba(255,255,255,0.75);
  width: 100%;
  height: 30px;
}
/* Text container centered in .blockdiv */
.textdiv {
  position: relative;
  float: left;
  top: 50%;
  left: 50%;
  transform: translate(-50%, -50%);
}

To insert a static text element and its container, we can create a small JS routine that creates parent and child nodes that replace the panel’s title container:

% Make a nodeID string to make the JS call more generic
nodeID = sprintf('''[%s="%s"]''', panelID.ID_attr, panelID.ID_val);
 
% JS that creates a div within a div, each with their own classes
% The inner div gets the text and is centered within the outer div
% These elements are added before the node MATLAB will use for any controls
% added to scrollPane
js = sprintf( ...
  [ ...
    'var d = document.createElement("div");', ...
    'var t = document.createElement("div");', ...
    'd.classList.add("blockdiv");',...
    't.classList.add("textdiv");', ...
    't.innerHTML= "Some Static Text";', ...
    'd.appendChild(t);', ...
    'document.querySelectorAll(%s)[0]',...
    '.replaceChild(d,document.querySelectorAll(%s)[0].firstChild);' ...
  ], ...
  nodeID, nodeID ...
);
 
% execute the JS
webWindow.executeJS(js);

Panel background and static elements

It seems to me that this approach might help to make lighter-weight apps, instead of having to make all those app.Label objects in Matlab’s App-Designer.

Quick recap

So let’s restate the process:

  1. Create a uipanel with the Position property set accordingly large enough for your control elements.
  2. Use mlapptools.setStyle() to set the overflow style attribute as desired.
  3. Use mlapptools.setStyle() to set the width and/or height style attributes to the viewing size (this is how big the viewing area of the panel needs to be in order to fit nicely in your app).
  4. Add your control elements with the scrolling uipanel as the parent.
  5. If you want some special styles, create a stylesheet and inject it into the <head> and be sure to add the class to your panel’s HTML classList.

The order of items 2-4 are not really important. You just need to ensure that the panel is large enough (via its Position property) to include all your elements/controls.

I really hope that one day soon MathWorks will add CSS and JS hooks to uifigure GUI components (perhaps as settable CSS/JS properties that accept strings?), so that Matlab users could attach their own CSS and JS customizations directly within AppDesigner, without having to go through such undocumented hoops as I’ve shown here. In Loren Shure’s latest blog post, Matlab product manager Dave Garisson indicated that this is indeed planned for a near-future Matlab release (at least for JS, but hopefully also for CSS):

“we are also investigating ways to provide a documented solution for integrating 3rd party JavaScript components in MATLAB apps.”

A complete working example

I created a complete working example in Matlab’s App Designer while figuring this whole thing out. The code (CWE.m) can be downloaded here, and then run directly from Matlab’s command window. Alternatively, the corresponding App Designer file (CWE.mlapp) can be downloaded here. You are welcome to use/adapt the code in your own project. Just to be clear, I love wild colors and crazy themes, but I don’t recommend going this overboard for a real project.

Running app demo
Running app demo

I can’t thank Yair enough for suggesting that I turn this tip into a guest post for you readers. And I want to give a huge thank you to you, the reader, for persevering all the way to the end of this post…

Cheers!
-Khris

Matlab callbacks for uifigure JavaScript events

$
0
0

I would like to welcome back guest blogger Iliya Romm of Israel’s Technion Turbomachinery and Heat Transfer Laboratory. Today Iliya will discuss how to assign Matlab callbacks to JavaScript events in the new web-based uifigures. Other posts on customizations of web-based Matlab GUI can be found here.

On several occasions (including the previous post by Khris Griffis) I came across people who were really missing the ability to have Matlab respond to various JavaScript (JS) events. While MathWorks are working on their plans to incorporate something similar to this in future releases, we’ll explore the internal tools already available, in the hopes of finding a suitable intermediate solution.

Today I’d like to share a technique I’ve been experimenting with, allowing Matlab to respond to pretty much any JS event to which we can attach a listener. This is an overview of how it works:

  1. create a UIFigure with the desired contents, and add to it (at least) one more dummy control, which has an associated Matlab callback.
  2. execute a JS snippet that programmatically interacts with the dummy control, whenever some event-of-interest happens, causing the Matlab callback to fire.
  3. query the webWindow, from within the Matlab callback, to retrieve any additional information (“payload”) that the JS passed.

This approach allows, for example, to easily respond to mouse events:

Attaching Matlab callback to a uifigure JavaScript event

Consider the code below, which demonstrates different ways of responding to JS events. To run it, save the .m file function below (direct download link) and the four accompanying .js files in the same folder, then run jsEventDemo(demoNum), where demoNum is 1..4. Note: this code was developed on R2018a, unfortunately I cannot guarantee it works on other releases.

function varargout = jsEventDemo(demoNum)
   % Handle inputs and outputs
   if ~nargin
      demoNum = 4;
   end
   if ~nargout
      varargout = {};
   end
 
   % Create a simple figure:
   hFig = uifigure('Position',[680,680,330,240],'Resize','off');
   hTA = uitextarea(hFig, 'Value', 'Psst... Come here...!','Editable','off');
   [hWin,idTA] = mlapptools.getWebElements(hTA);
 
   % Open in browser (DEBUG):
   % mlapptools.waitForFigureReady(hFig); mlapptools.unlockUIFig(hFig); pause(1);
   % web(hWin.URL,'-browser')
 
   % Prepare the JS command corresponding to the requested demo (1-4)
   switch demoNum
      % Demo #1: Respond to mouse events, inside JS, using "onSomething" bindings:
      case 1
         % Example from: https://dojotoolkit.org/documentation/tutorials/1.10/events/#dom-events
         jsCommand = sprintf(fileread('jsDemo1.js'), idTA.ID_val);
 
      % Demo #2: Respond to mouse click events, inside JS, using pub/sub:
      case 2
         % Example from: https://dojotoolkit.org/documentation/tutorials/1.10/events/#publish-subscribe
         hTA.Value = 'Click here and see what happens';
         jsCommand = sprintf(fileread('jsDemo2.js'), idTA.ID_val);
 
      % Demo #3: Trigger Matlab callbacks programmatically from JS by "pressing" a fake button:
      case 3
         hB = uibutton(hFig, 'Visible', 'off', 'Position', [0 0 0 0], ...
                       'ButtonPushedFcn', @fakeButtonCallback);
         [~,idB] = mlapptools.getWebElements(hB);
         jsCommand = sprintf(fileread('jsDemo3.js'), idTA.ID_val, idB.ID_val);
 
      % Demo 4: Trigger Matlab callbacks and include a "payload" (i.e. eventData) JSON:
      case 4
         hB = uibutton(hFig, 'Visible', 'off', 'Position', [0 0 0 0],...
                      'ButtonPushedFcn', @(varargin)smartFakeCallback(varargin{:}, hWin));
         [~,idB] = mlapptools.getWebElements(hB);
         jsCommand = sprintf(fileread('jsDemo4.js'), idTA.ID_val, idB.ID_val);
   end % switch
 
   % Execute the JS command
   hWin.executeJS(jsCommand);
end
 
% Matlab callback function used by Demo #3
function fakeButtonCallback(obj, eventData) %#ok<INUSD>
   disp('Callback activated!');
   pause(2);
end
 
% Matlab callback function used by Demo #4
function smartFakeCallback(obj, eventData, hWin)
   % Retrieve and decode payload JSON:
   payload = jsondecode(hWin.executeJS('payload'));
 
   % Print payload summary to the command window:
   disp(['Responding to the fake ' eventData.EventName ...
         ' event with the payload: ' jsonencode(payload) '.']);
 
   % Update the TextArea
   switch char(payload.action)
      case 'enter',  act_txt = 'entered';
      case 'leave',  act_txt = 'left';
   end
   str = ["Mouse " + act_txt + ' from: '; ...
          "(" + payload.coord(1) + ',' + payload.coord(2) + ')'];  
   obj.Parent.Children(2).Value = str;
end

Several thoughts:

  • The attached .js files will not work by themselves, rather, they require sprintf to replace the %s with valid widget IDs. Of course, these could be made into proper JS functions.
  • Instead of loading the JS files using fileread, we could place the JS code directly in the jsCommand variable, as a Matlab string (char array)
  • I tried getting it to work with a textarea control, so that we would get the payload right in the callback’s eventData object in Matlab, Unfortunately, I couldn’t get it to fire programmatically (solutions like this didn’t work). So instead, I store the payload as JSON, and retrieve it with jsondecode(hWin.executeJS('payload')) in the smartFakeCallback function.

JavaScript files

  1. jsDemo1.js (direct download link):
    require(["dojo/on", "dojo/dom", "dojo/dom-style", "dojo/mouse"],
    	function(on, dom, domStyle, mouse) {
    		var myDiv = dom.byId("%s");
    		on(myDiv, mouse.enter, function(evt){
    			domStyle.set(myDiv, "backgroundColor", "red");
    		});
    		on(myDiv, mouse.leave, function(evt){
    			domStyle.set(myDiv, "backgroundColor", "");
    		});
    	});
  2. jsDemo2.js (direct download link):
    require(["dojo/on", "dojo/topic", "dojo/dom"],
    	function(on, topic, dom) {
    		var myDiv = dom.byId("%s");
    		on(myDiv, "click", function() {
    			topic.publish("alertUser", "Your click was converted into an alert!");
    		});
    		topic.subscribe("alertUser", function(text){
    			alert(text);
    		});
    	});
  3. jsDemo3.js (direct download link):
    require(["dojo/on", "dojo/dom", "dojo/dom-style", "dojo/mouse"],
    	function(on, dom, domStyle, mouse) {
    		var myDiv = dom.byId("%s");
    		var fakeButton = dom.byId("%s");
    		on(myDiv, mouse.enter, function(evt){
    			fakeButton.click();
    		});
    	});
  4. jsDemo4.js (direct download link):
    var payload = [];
    require(["dojo/on", "dojo/dom", "dojo/topic", "dojo/mouse"],
    	function(on, dom, topic, mouse) {
    		var myDiv = dom.byId("%s");
    		var fakeButton = dom.byId("%s");
    		topic.subscribe("sendToMatlab", function(data){
    			payload = data;
    			fakeButton.click();
    		});
    		on(myDiv, mouse.enter, function(evt){
    			data = {action: "enter",
    				coord: [evt.clientX, evt.clientY]};
    			topic.publish("sendToMatlab", data);
    		});
    		on(myDiv, mouse.leave, function(evt){
    			data = {action: "leave",
    				coord: [evt.clientX, evt.clientY]};
    			topic.publish("sendToMatlab", data);
    		});
    	});

Conclusions

As you can see, this opens some interesting possibilities, and I encourage you to experiment with them yourself! This feature will likely be added to the mlapptools toolbox as soon as an intuitive API is conceived.

If you have any comments or questions about the code above, or just want to tell me how you harnessed this mechanism to upgrade your uifigure (I would love to hear about it!), feel free to leave a message below the gist on which this post is based (this way I get notifications!).

Matlab toolstrip – part 1

$
0
0

The Matlab toolstrip (ribbon) has been around officially since R2012a, and unofficially for a couple of years earlier. Since then, I blogged about the toolstrip only rarely (example). I believe the time has come to start a short mini-series about this functionality, eventually showing how users can use toolstrips in their own custom applications.

My plan is to start the miniseries with a discussion of the built-in showcase examples, followed by a post on the built-in classes that make up the toolstrip building-blocks. Finally, I’ll describe how toolstrips can be added to figures, not just in client/tool groups.

Matlab’s internal showcase examples

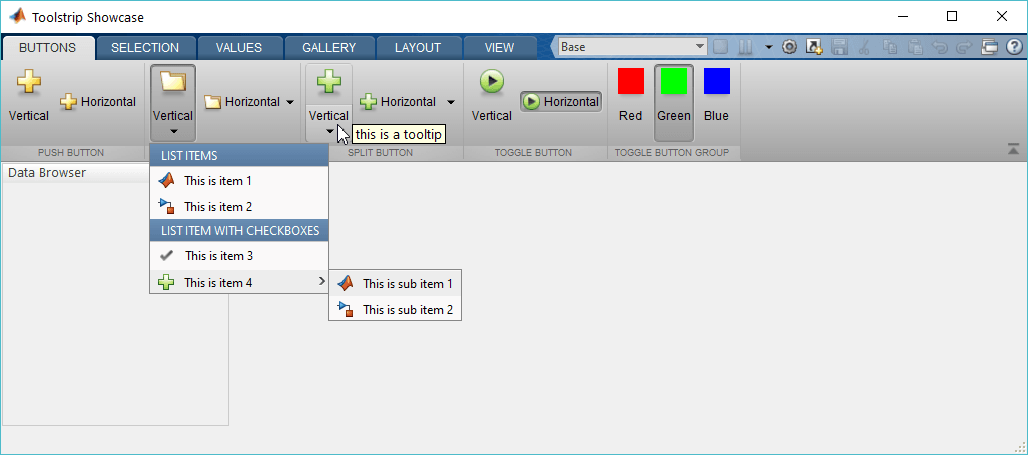
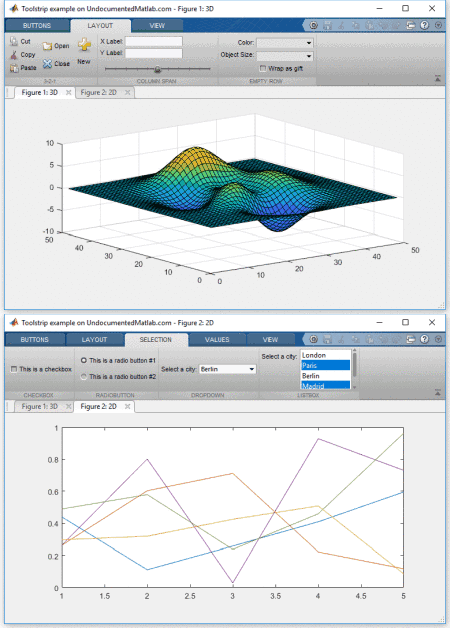
I start the discussion with a description of built-in examples for the toolstrip functionality, located in %matlabroot%/toolbox/matlab/toolstrip/+matlab/+ui/+internal/+desktop/. The most important of these are showcaseToolGroup.m and showcaseMPCDesigner.m, both of which use Java-based (Swing) containers and controls. Readers who wish to integrate toolstrips into their app immediately, without waiting for my followup posts in this series, are welcome to dig into the examples’ source-code and replicate it in their programs:

1. showcaseToolGroup
h = matlab.ui.internal.desktop.showcaseToolGroup

showcaseToolGroup built-in example

2. showcaseMPCDesigner
>> h = matlab.ui.internal.desktop.showcaseMPCDesigner
 
h =
  showcaseMPCDesigner with properties:
 
    ToolGroup: [1×1 matlab.ui.internal.desktop.ToolGroup]
       Dialog: [1×1 toolpack.component.TSTearOffPopup]
      Figure1: [1×1 Figure]
      Figure2: [1×1 Figure]

showcaseMPCDesigner built-in example
3. showcaseHTML and showcaseCEF

In addition to these showcase examples, the folder also contains a showcaseHTML.m and showcaseCEF.m files, that are supposed to showcase the toolstrip functionality in JavaScript-based containers (browser webpage and uifigure apps, respectively). Unfortunately, on my system running these classes displays blank, although the toolstrip is indeed created, as seen below (if you find out how to make these classes work, please let me know):

>> h = matlab.ui.internal.desktop.showcaseHTML
building toolstrip hierarchy...
rendering toolstrip...
 
h = 
  Toolstrip with properties:
 
               SelectedTab: [1×1 matlab.ui.internal.toolstrip.Tab]
              DisplayState: 'expanded'
    DisplayStateChangedFcn: @PropertyChangedCallback
                       Tag: 'toolstrip'
 
>> hs = struct(h)
Warning: Calling STRUCT on an object prevents the object from hiding its implementation details and should thus be avoided.
Use DISP or DISPLAY to see the visible public details of an object. See 'help struct' for more information.
(Type "warning off MATLAB:structOnObject" to suppress this warning.)
 
hs = 
  struct with fields:
 
                         SelectedTab: [1×1 matlab.ui.internal.toolstrip.Tab]
                        DisplayState: 'expanded'
              DisplayStateChangedFcn: @PropertyChangedCallback
                 DisplayStatePrivate: 'expanded'
                        QABIdPrivate: '2741bf89'
               QuickAccessBarPrivate: [1×1 matlab.ui.internal.toolstrip.impl.QuickAccessBar]
       DisplayStateChangedFcnPrivate: @PropertyChangedCallback
         SelectedTabChangedListeners: [1×1 event.listener]
                                 Tag: 'toolstrip'
                                Type: 'Toolstrip'
                          TagPrivate: 'toolstrip'
    WidgetPropertyMap_FromMCOSToPeer: [3×1 containers.Map]
    WidgetPropertyMap_FromPeerToMCOS: [3×1 containers.Map]
                              Parent: [0×0 matlab.ui.internal.toolstrip.base.Node]
                            Children: [1×1 matlab.ui.internal.toolstrip.TabGroup]
                             Parent_: []
                           Children_: [1×1 matlab.ui.internal.toolstrip.TabGroup]
                                Peer: [1×1 com.mathworks.peermodel.impl.PeerNodeImpl]
                   PropertySetSource: [1 java.util.HashMap]
                    PeerModelChannel: '/ToolstripShowcaseChannel'
                   PeerEventListener: [1×1 handle.listener]
                 PropertySetListener: [1×1 handle.listener]
 
>> hs.Peer
ans =
PeerNodeImpl{id='4a1e4b08', type='Toolstrip', properties={displayState=expanded, hostId=ToolStripShowcaseDIV, tag=toolstrip, QABId=2741bf89}, parent=878b0e2b, children=[
    PeerNodeImpl{id='5bb9632c', type='TabGroup', properties={QAGroupId=ea9b628c, tag=, selectedTab=f90db10c}, parent=4a1e4b08, children=[
        PeerNodeImpl{id='f90db10c', type='Tab', properties={mnemonic=, tag=tab_buttons, title=BUTTONS}, parent=5bb9632c, children=[
            PeerNodeImpl{id='1ccc9246', type='Section', properties={collapsePriority=0.0, mnemonic=, tag=sec_push, title=PUSH BUTTON}, parent=f90db10c, children=[
                PeerNodeImpl{id='8323f06e', type='Column', properties={horizontalAlignment=left, width=0.0, tag=}, parent=1ccc9246, children=[
                    PeerNodeImpl{id='af368d7b', type='PushButton', properties={textOverride=, descriptionOverride=, mnemonic=, actionId=230d471b, iconOverride=, tag=pushV, iconPathOverride=}, parent=8323f06e, children=[]}]}
                PeerNodeImpl{id='a557a712', type='Column', properties={horizontalAlignment=left, width=0.0, tag=}, parent=1ccc9246, children=[
                    PeerNodeImpl{id='f0d6a9fc', type='EmptyControl', properties={tag=}, parent=a557a712, children=[]}
                    PeerNodeImpl{id='74bc4cd2', type='PushButton', properties={textOverride=, descriptionOverride=, mnemonic=, actionId=12d6a26a, iconOverride=, tag=pushH, iconPathOverride=}, parent=a557a712, children=[]}
                    PeerNodeImpl{id='bcb5a9d0', type='EmptyControl', properties={tag=}, parent=a557a712, children=[]}]}]}
            PeerNodeImpl{id='0e515319', type='Section', properties={collapsePriority=0.0, mnemonic=, tag=sec_dropdown, title=DROP DOWN BUTTON}, parent=f90db10c, children=[
                PeerNodeImpl{id='80482225', type='Column', properties={horizontalAlignment=left, width=0.0, tag=}, parent=0e515319, children=[
                    PeerNodeImpl{id='469f469a', type='DropDownButton', properties={textOverride=, descriptionOverride=, mnemonic=, actionId=c6ca7335, iconOverride=, tag=dropdownV, iconPathOverride=}, parent=80482225, children=[]}]}
                ...

Note: showcaseCEF has been removed in 2018, but is available in older Matlab releases.

Levels of toolstrip encapsulation

Matlab currently has several levels of encapsulation for toolstrip components:

  • Top-level m-file classes for showcasing the toolstrip functionality and creating toolstrips in Java-based containers and web-based apps – these are located in %matlabroot%/toolbox/matlab/toolstrip/+matlab/+ui/+internal/+desktop/
  • Mid-level m-file classes that contain the toolstrip building blocks (tabs, sections, controls) – these are located in %matlabroot%/toolbox/matlab/toolstrip/+matlab/+ui/+internal/+toolstrip/
  • Low-level Java classes that implement the underlying user-interface for Java-based UI – these are located in %matlabroot%/java/jar/toolstrip.jar. I discussed this briefly in a post few years ago.

The top- and mid-level m-file classes are provided with full source code that is quite well-documented internally (as m-file source-code comments). However, note that it is not officially documented or supported (i.e., semi-documented in this blog’s parlance).

The low-level Java classes on the other hand are compiled without available source code – we can inspect these classes (e.g., using uiinspect or checkClass), but we cannot see their original source-code. Luckily, the higher-level m-file classes provide us with plenty of hints and usage examples that we could use to tailor the appearance, functionality and integration of toolstrip components into our app.

Robyn Jackey’s Widgets Toolbox

Users who hesitate to mess around with the built-in toolstrip functionality may find interest in MathWorker Robyn Jackey’s Toolstrip look-alike, which is part of his open-source Widgets Toolbox on the Matlab File Exchange. Unlike other parts of Robyn’s toolbox, which use undocumented functionality, his Toolstrip class seems to use documented components (panels, uicontrols etc.), with just a small reliance on undocumented functionality (matlab.ui.* for example). This has a fair chance to continue working well into future releases, even if Matlab’s built-in toolstrip functionality changes:

Robyn Jackey's Toolstrip look-alike

Strong caution

Over the years, Matlab’s internal toolstrip interface has changed somewhat, but not dramatically. This could change at any time, since the toolstrip uses deeply undocumented functionality. What I will demonstrate over the next few posts might stop working in R2019a, or in R2025b – nobody really knows, perhaps not even MathWorks at this stage. Something that we do know for a fact is that Matlab is slowly transitioning away from Java-based user interfaces to web-based (HTML/JavaScript/CSS) interfaces, and this could have a drastic effect on the toolstrip functionality/API. It seems reasonable to assume that even if MathWorks would one day open up the toolstrip functionality, this would only be for the new web-based uifigure apps (not legacy Java-based figures), and might well have a different API than the one that I’ll discuss in this miniseries. Still, users could use the unofficial/undocumented information that I present here in their own Java figures today and quite possibly also in near-term upcoming releases.

Despite the many unknowns regarding future supportability/roadmap of the built-in toolstrip API, I believe that my readers are smart enough to decide for themselves whether they want to take the associated risks to improve their Matlab programs today, or wait until a documented API will possibly be provided sometime in the future. The choice is yours, as it always is when using undocumented tips from my blog.

With this warning stated, let’s start having fun with Matlab’s built-in toolstrip!

Matlab toolstrip – part 2 (ToolGroup App)

$
0
0

A while ago I posted the first of my planned miniseries on the Matlab toolstrip (ribbon). Today I will expand that post by discussing how toolstrips can be added to Matlab GUIs. This post will remain at a high-level as the previous post, with followup posts drilling into the technical details of the toolstrip components (inner packages and classes).

We can add a Matlab toolstrip to 3 types of Matlab GUI windows:

  1. To a Java-based Matlab figure (so-called “legacy” figures, created using GUIDE or the figure function)
  2. To a container window of docked Java-based figures, typically called an “App” (marketing name) or “Tool Group” (internal technical name)
  3. To a JavaScript/HTML-based Matlab figure (so called “web” figures, created using App Designer or the uifigure function)

Today I will show how to add a basic dynamic toolstrip to a ToolGroup (App, window type #2):

ToolGroup with clients and dynamic toolstrip

ToolGroup with clients and dynamic toolstrip


Figure containers (“Tool Groups”)

Most Matlab users are familiar with window types #1 and #3 (legacy and web-based figures), but type #2 may seem strange. In fact, it shouldn’t be: All the Matlab “Apps” and Desktop components use such a container of docked clients. For example, both the Matlab Editor and Desktop are containers of individual client windows (individual files in the Editor; Command Window, Workspace etc. in the desktop).

Similarly, when we dock figures, they dock as client windows into a container called “Figures” (this can be controlled programmatically: see my setFigDockGroup utility on the File Exchange). This is the basis for all Matlab “Apps”, as far as I am aware (some Apps may possibly use a different GUI container, after all there are ~100 Matlab Apps and I’m not familiar with all of them). Such Apps are basically stand-alone Tool Groups (client container windows) that contain one or more docked figures, a toolstrip, and a side-panel with controls (so-called “Data Browser”).

Note: MathWorks uses confusing terminology here, using the same term “App” for both MathWorks-created GUIs containers (that have toolstrips, Data Browser and docked figures) and also user-created utilities on the File Exchange (that do not have these). Unfortunately, MathWorks has chosen not [yet] to release to the general public its set of tools that enable creating true “Apps”, i.e. those that have a toolstrip, Data Browser and docked figures.

Today’s post will attempt to fill this gap, by showing how we can create user Apps that have a toolstrip and docked figures. I will ignore the Data Browser today, and will describe it in a future post. Since docking figures into a standalone user-created container is a solved problem (using my setFigDockGroup utility), this post will focus on adding a toolstrip to such a container.

A ToolGroup object (matlab.ui.internal.desktop.ToolGroup) is created either implicitly (by docking a figure into a group that has a new name), or explicitly (by invoking its constructor):

% Create a new non-visible empty App (Tool Group)
hToolGroup = matlab.ui.internal.desktop.ToolGroup('Toolstrip example on UndocumentedMatlab.com');

Some things only work properly after the app is displayed, so let’s display the ToolGroup (however, note that for improved performance it is better to do whatever customizations and GUI updates that you can before the app is made visible):

% Display the ToolGroup window
hToolGroup.open();

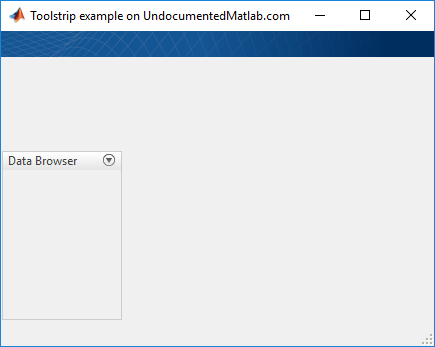
Basic empty ToolGroup (without toolstrip or clients)

Basic empty ToolGroup (without toolstrip or clients)

An annoying quirk with ToolGroups is that they automatically close when their reference handle is deleted from Matlab memory. The specific behavior changes depending on the contents of the container and the Matlab release, but in general it’s safest to preserve the hToolGroup variable, to prevent the window from closing, when this variable goes out of scope, when the function (in which we create the ToolGroup) returns. There are many ways to persist this variable. Here’s one alternative, in which we persist it in itself (or rather, attached to its internal Java peer control):

% Store toolgroup reference handle so that app will stay in memory
jToolGroup = hToolGroup.Peer;
internal.setJavaCustomData(jToolGroup, hToolGroup);

internal.setJavaCustomData is an undocumented Matlab function that adds a new custom property to a Java reference handle. In our case, it adds a CustomData property to the jToolGroup handle and sets its value to the Matlab hToolGroup handle. The source code for internal.setJavaCustomData is available in %matlabroot%/toolbox/shared/controllib/general/+internal/setJavaCustomData.m and is very simple: it essentially uses the old schema-based schema.prop method for adding new properties to handles. Schema is an old deprecated mechanism that is mostly replaced by the newer MCOS (Matlab Class Object System), but for some specific cases such as this it’s still very useful (the standard addprop function can add new properties to Matlab GUI handles, but not to Java reference handles).

Finally, let’s discard the Data Browser side panel (I’ll discuss it in a separate future post):

% Discard the Data-browser left panel
hToolGroup.disableDataBrowser();

Adding a toolstrip to the ToolGroup

Now that we have the basic container ready, let’s add a toolstrip. To simplify matters in this introductory post (after all, I have still not described the internal packages and classes that make up a toolstrip), we’ll use some of the tabs used in the showcaseToolGroup example that I discussed in my previous post. You can see the relevant source code in %matlabroot%/toolbox/matlab/toolstrip/+matlab/+ui/+internal/+desktop/*.m, in case you want to jump ahead and customize your own toolstrip tabs, groups and buttons. In the code snippet below, we first create an empty TabGroup, then add toolstrip tabs into it, and finally add this TabGroup into our ToolGroup using its addTabGroup(hTabGroup) method:

% Create a new tab group
%hTabGroup = matlab.ui.internal.desktop.showcaseBuildTabGroup('swing');
hTabGroup = matlab.ui.internal.toolstrip.TabGroup();
hTab1 = matlab.ui.internal.desktop.showcaseBuildTab_Buttons('swing');
hTabGroup.add(hTab1);
%hTabGroup.add(matlab.ui.internal.desktop.showcaseBuildTab_Gallery());
hTabGroup.add(matlab.ui.internal.desktop.showcaseBuildTab_Layout('swing'));
 
% Select tab #1 (common)
hTabGroup.SelectedTab = hTab1;
 
% Add the tab group to the built-in toolstrip
hToolGroup.addTabGroup(hTabGroup);

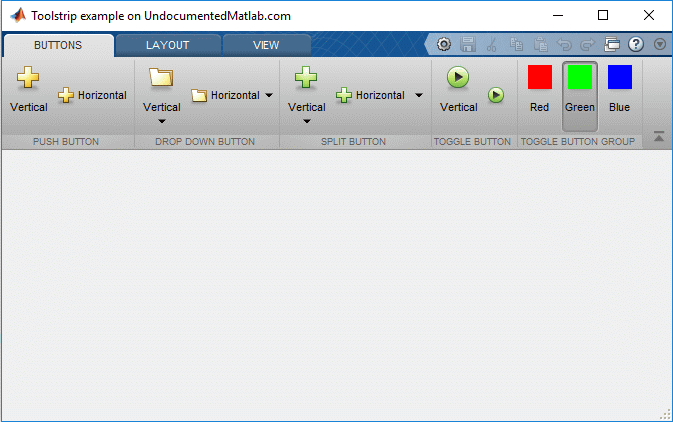
We now have an “App” that has a toolstrip, but no clients (yet), and a hidden Data Browser side-panel:

ToolGroup "App" with a simple toolstrip (no clients yet)

Now let’s add some clients (docked figures):

Adding clients (docked figures) to the ToolGroup

There are two easy variants for adding docked figures in a ToolGroup: The easiest is to use the ToolGroup’s addFigure(hFigure) method:

% Create a figure and dock it into the tool-group
hFig1 = figure('Name','3D');
surf(peaks);
hToolGroup.addFigure(hFig1);

The second variant enables to dock a figure that has a specific set of toolstrip tabs attached to it. These tabs will only display in the toolstrip when that particular figure has focus. We do this by creating a new TabGroup (just as we have done above), and then add the figure and TabGroup to the container using the ToolGroup’s addClientTabGroup(hFigure,hTabGroup) method:

% Create the 2nd figure
hFig2 = figure('Name','2D');
plot(rand(5));
 
% Add a few tabs that are only relevant to this specific figure
hTabGroup2 = TabGroup();
hTab2 = matlab.ui.internal.desktop.showcaseBuildTab_Selections();
hTabGroup2.add(hTab2);
hTabGroup2.add(matlab.ui.internal.desktop.showcaseBuildTab_EditValue());
 
% Add the figure and tabs to the ToolGroup
hToolGroup.addClientTabGroup(hFig2, hTabGroup2);

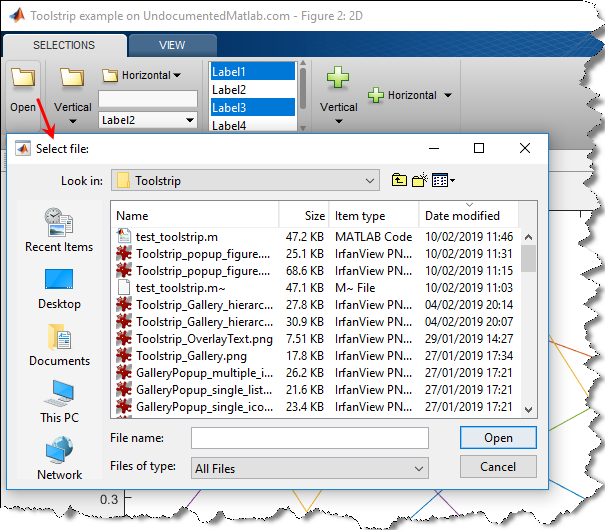
ToolGroup with clients and dynamic toolstrip

ToolGroup with clients and dynamic toolstrip

In this example, the “Selection” and “Values” toolstrip tabs only appear when the 2nd figure (“2D”) has focus. A similar behavior exists in the Matlab Desktop and Editor, where some tabs are only shown when certain clients have focus.

Removing the View tab

Note that the “View” toolstrip tab (which enables setting the appearance of the docked figures: layout, tab positions (top/bottom/left/right), ordering etc.) is automatically added to the toolstrip and always appears last. We can remove this View tab using the ToolGroup’s hideViewTab() method. The tab will not immediately be removed, only when the toolstrip is repainted, for example, when we switch focus between the docked figures:

hToolGroup.hideViewTab;  % toolstrip View tab is still visible at this point
figure(hFig1);  % change focus to hFig1 - toolstrip is repainted without View tab

Conclusion

It’s relatively easy to dock figures into a standalone “App” window that has a custom toolstrip, which can even be dynamically modified based on the figure which is currently in focus. Naturally, this has little benefit if we cannot customize the toolstrip components: labels, icons, control type, grouping and most importantly – callbacks. This topic deserves a dedicated post, which I plan to be the next in this miniseries. Stay tuned – hopefully the next post will not take me as long to publish as this post (I was quite busy recently)…

Matlab toolstrip – part 3 (basic customization)

$
0
0

In the previous post I showed how we can create custom Matlab apps. In such apps, the toolstrip is very often an important part. Today I continue my miniseries on toolstrips. Toolstrips can be a bit complex so I’m trying to proceed slowly, with each post in the miniseries building on the previous posts. So I encourage you to review the earlier posts in the miniseries (part1, part2) before reading this post.

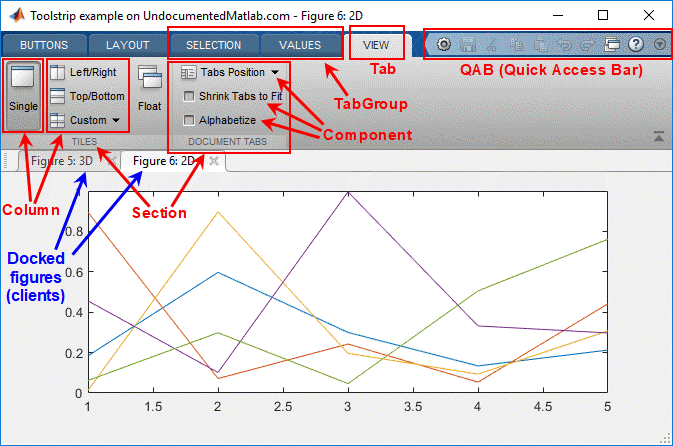
A Matlab toolstrip is composed of a hierarchy of user-interface objects as follows (all objects are classes within the matlab.ui.internal.toolstrip package):

Anatomy of a Matlab app with toolstrip

Anatomy of a Matlab app with toolstrip

  • TabGroup
    • Tab
      • Section
        • Column
          • Component
            • Component
          • Column
        • Section
      • Tab
    • TabGroup

    In this post I explain how we can create a custom toolstrip that contains tabs, sections, and basic controls that interact with the user and the docked figures. The following posts will show more advanced customizations and more complex controls, as well as showing alternative ways of creating the toolstrip.

    1. Creating a bare toolstrip and new tabs

    We start with a new ToolGroup that has a bare toolstrip and a docked figure (for details and explanations refer to the previous post):

    % Create a new ToolGroup ("app") with a hidden DataBrowser
    hToolGroup = matlab.ui.internal.desktop.ToolGroup('Toolstrip example on UndocumentedMatlab.com');
    hToolGroup.disableDataBrowser();
    hToolGroup.open();  % this may be postponed further down for improved performance
     
    % Store toolgroup reference handle so that app will stay in memory
    jToolGroup = hToolGroup.Peer;
    internal.setJavaCustomData(jToolGroup, hToolGroup);
     
    % Create two figures and dock them into the ToolGroup
    hFig1 = figure('Name','3D');  surf(peaks);
    hToolGroup.addFigure(hFig1);

    We now create a new TabGroup and and it to our ToolGroup:

    import matlab.ui.internal.toolstrip.*  % for convenience below
    hTabGroup = TabGroup();
    hToolGroup.addTabGroup(hTabGroup);

    We can add a new Tab to the TabGroup using either of two methods:

    1. Create a new Tab object and then use TabGroup.add(hTab,index) to add it to a parent TabGroup. The index argument is optional – if specified the section is inserted at that index location; if not, it is added at the end of the tab-group. Sample usage:
      hTab = Tab('Data');
      hTabGroup.add(hTab);  % add to tab as the last section
      hTabGroup.add(hTab,3);  % add to tab as the 3rd section
    2. Call TabGroup.addTab(title). This creates a new tab with the specified title (default: ”) and adds it at the end of the tab-group. The new tab’s handle is returned by the function. Sample usage:
      hTabGroup.addTab('Data');  % add to tab-group as the last tab

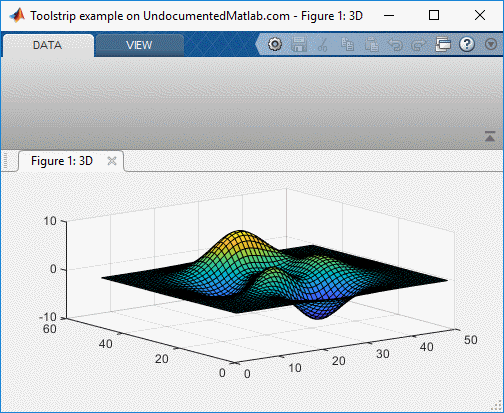
    This creates an empty “Data” tab in our app toolstrip. Note that the tab title is capitalized (“DATA”), despite the fact that we set its Title property to 'Data'. Also note that while the tab’s Title property can be updated after the tab is created, in practice the tab title does not seem to change.

    New (empty) toolstrip tab

    Lastly, note that a “VIEW” tab is automatically added to our toolstrip. As explained in the previous post, we can remove it using hToolGroup.hideViewTab; (refer to the previous post for details).

    2. Adding sections to a toolstrip tab

    Each toolstrip Tab is composed of Sections, that holds the actual components. We cannot add components directly to a Tab: they have to be contained within a Section. A toolstrip Tab can only contain Sections as direct children.

    We can add a new section to a Tab using either of two methods, in a similar way to the that way we added a new tab above:

    1. Create a new Section object and then use Tab.add(hSection,index) to add it to a parent Tab. The index argument is optional – if specified the section is inserted at that index location; if not, it is added at the end of the tab. Sample usage:
      hSection = Section('Section title');
      hTab.add(hSection);  % add to tab as the last section
      hTab.add(hSection,3);  % add to tab as the 3rd section
    2. Call Tab.addSection(title). This creates a new section with the specified title (default: ”) and adds it at the end of the tab. The new section’s handle is returned by the function. Sample usage:
      hTab.addSection('Section title');  % add to tab as the last section

    Note that the help section for Tab.addSection() indicates that it’s possible to specify 2 string input args (presumably Title and Tag), but this is in fact wrong and causes a run-time error, since Section constructor only accepts a single argument (Title), at least as of R2018b.

    The Section‘s Title property can be set both in the constructor, as well as updated later. In addition, we can also set the Tag and CollapsePriority properties after the section object is created (these properties cannot be set in the constructor call):

    hSection.Title = 'New title';    % can also be set in constructor call
    hSection.Tag = 'section #1';     % cannot be set in constructor call
    hSection.CollapsePriority = 10;  % cannot be set in constructor call

    The CollapsePriority property is responsible for controlling the order in which sections and their internal components collapse into a drop-down when the window is resized to a smaller width.

    Like tabs, section titles also appear capitalized. However, unlike the section titles can indeed be modified in run-time.

    3. Adding columns to a tab section

    Each Section in a toolstrip Tab is composed of Columns, and each Column can contain 1-3 Components. This is a very effective layout for toolstrip controls that answers the vast majority of use-cases. In some special cases we might need more flexibility with the component layout within a Tab – I will explain this in a future post. But for now let’s stick to the standard Tab-Section-Column-Component framework.

    We can add columns to a section using (guess what?) either of two methods, as above:

    1. Create a new Column object and then use Section.add(hColumn,index) to add it to a parent Section. The index argument is optional – if specified the column is inserted at that index location; if not, it is added at the end of the section. Sample usage:
      hColumn = Column('HorizontalAlignment','center', 'Width',150);
      hSection.add(hColumn);  % add to section as the last column
      hSection.add(hColumn,3);  % add to section as the 3rd column
    2. Call Tab.addSection(title). This creates a new section with the specified title (default: ”) and adds it at the end of the tab. The new section’s handle is returned by the function. Sample usage:
      hSection.addColumn('HorizontalAlignment','center', 'Width',150);  % add to section as the last column

    We can set the Column‘s HorizontalAlignment and Width properties only in the constructor call, not later via direct assignments. In contrast, the Tag property cannot be set in the constructor, only via direct assignment:

    hColumn.HorizontalAlignment = 'right';  % error: can only be set via constructor call: Column('HorizontalAlignment','right', ...)
    hColumn.Width = 150;                    % error: can only be set via constructor call: Column('Width',150, ...)
    hColumn.Tag = 'column #2';              % ok: cannot be set via the constructor call!

    This is indeed confusing and non-intuitive. Perhaps this is part of the reason that the toolstrip API is still not considered stable enough for a general documented release.

    4. Adding controls to a section column

    Each section column contains 1 or more Components. These can be push/toggle/split/radio buttons, checkboxes, drop-downs, sliders, spinners, lists etc. Take a look at matlabroot%/toolbox/matlab/toolstrip/+matlab/+ui/+internal/+toolstrip/ for a full list of available controls. I’ll discuss a few basic controls in this post, and more complex ones in future posts.

    As above, there are two methods for adding components to a section column, but they have different purposes:

    1. Column.addEmptyControl() adds a filler space in the next position of the column. This is used to display the colorbar control at the center of the column in the usage snippet below.
    2. Create a new Component object and then use Column.add(hComponent, index) to add it to a parent Column. The index argument is optional – if specified the component is inserted at that index location; if not, it is added at the end of the column. Sample usage:
      hButton = Button('Click me!');
      hColumn.add(hButton);  % add to column as the last component
      hColumn.add(hButton,3);  % add to column as the 3rd component

    Component objects (matlab.ui.internal.toolstrip.base.Component, which all usable toolstrip controls inherit) have several common properties. Leaving aside the more complex components for now, most usable controls include the following properties:

    • Text – text label, displayed next to the control icon (pity that MathWorks didn’t call this property String or Label, in line with uicontrols/menu-items)
    • Description – tooltip, displayed when hovering the mouse over the control (pity that MathWorks didn’t call this property Tooltip in line with uicontrols/menu-items)
    • Tag – a string, as all other Matlab HG objects. Controls are searchable by their Tag via their container’s find(tag) and findAll(tag) methods (again, I don’t quite understand why not use findobj and findall as with the rest of Matlab HG…).
    • Enabled – a logical value (true/false), true by default
    • Icon – the icon used next to the Text label. We can use the Icon constructor (that expects the full path of a PNG/JPG file), or one of its static icons (e.g. Icon.REFRESH_16). Icons will be discussed in detail in the following post; in the meantime you can see various usage examples below.

    Each control also has one or more callbacks that can be specified, as settable properties and/or as events that can be listened-to using the addlistener function. This too will be discussed in detail in the next post, but in the meantime you can see various usage examples below.

    Columns can have 1-3 components:

    • If only 1 component is specified, it is allocated the full column height, effectively creating a large control, with the Icon on top (typically a 24×24 icon) and the Text label beneath.
    • If 2 or 3 components are specified, then smaller controls are displayed, with the Text label to the right of the Icon (typically 16×16), and the controls evenly spaced within the column.
    • If you try to add more than 3 components to a Column, you’ll get a run-time error.

    5. Usage example

    Here is a short usage example showing the above concepts. The code is not pretty by any means – I intentionally wanted to display multiple different ways of adding components, specifying properties and callbacks etc. It is meant merely as an educational tool, and is not close to being ready for production code. So please don’t complain about the known fact that the code is ugly, non-robust, and in general exhibits bad programming practices. The complete runnable code can be downloaded here.

    The following code snippets assume that you have already ran the code in paragraph 1 above:

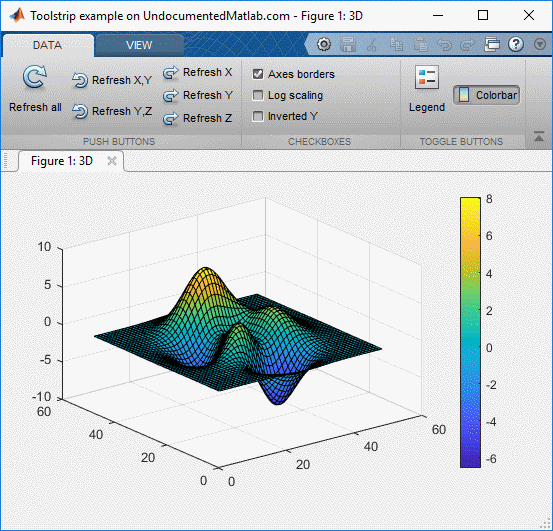
    Push-buttons section (3 columns)
    Toolstrip example (basic controls)

    Toolstrip example (basic controls)

    section1 = hTab.addSection('Push buttons');
     
    column1a = section1.addColumn();
    icon = Icon.REFRESH_24; % built-in: see Icon.showStandardIcons()
    button = Button('Refresh all',icon);
    button.Description = 'Refresh the charted data - all axes';
    button.ButtonPushedFcn = @refreshAllData;
    column1a.add(button);
    function refreshAllData(hAction,hEventData)
        hAxes = gca;
        hChildren = hAxes.Children;
        for idx = 1 : numel(hChildren)
            hChild = hChildren(idx);
            hChild.XData = -hChild.XData;
            hChild.YData = -hChild.YData;
            hChild.ZData = -hChild.ZData;
        end
    end
     
    column1b = section1.addColumn();
    addRefresh2Button('X','Y');
    addRefresh2Button('Y','Z');
    function addRefresh2Button(type1, type2)
        import matlab.ui.internal.toolstrip.*
        hButton = Button(['Refresh ' type1 ',' type2], Icon.RESTORE_16);
        hButton.Description = ['Refresh the charted data - ' type1 ',' type2 ' axes'];
        hButton.ButtonPushedFcn = {@refres2AxisData, type1, type2};
        column1b.add(hButton);
     
        function refres2AxisData(~,~,type1,type2)
            hAxes = gca;
            hChildren = hAxes.Children;
            for idx = 1 : numel(hChildren)
                hChild = hChildren(idx);
                hChild.([type1 'Data']) = -hChild.([type1 'Data']);
                hChild.([type2 'Data']) = -hChild.([type2 'Data']);
            end
        end
    end
     
    column1c = section1.addColumn();
    addRefresh1Button('X');
    addRefresh1Button('Y');
    addRefresh1Button('Z');
    function addRefresh1Button(type)
        import matlab.ui.internal.toolstrip.*
        hButton = Button(['Refresh ' type], Icon.REDO_16);
        hButton.Description = ['Refresh the charted data - ' type ' axes'];
        addlistener(hButton, 'ButtonPushed', @refres1AxisData);  % {} not supported!
        column1c.add(hButton);
     
        function refres1AxisData(h,e)
            hAxes = gca;
            hChildren = hAxes.Children;
            for idx = 1 : numel(hChildren)
                hChild = hChildren(idx);
                hChild.([type 'Data']) = -hChild.([type 'Data']);
            end
        end
    end
    Toggle buttons section (2 columns)
    section2 = hTab.addSection('Toggle buttons');
    section2.CollapsePriority = 2;
     
    column1 = Column();
    section2.add(column1);
    %icon = Icon.LEGEND_24;
    icon = Icon(fullfile(matlabroot,'toolbox','shared','controllib','general','resources','toolstrip_icons','Legend_24.png')); % PNG/JPG image file (not GIF!)
    button = ToggleButton('Legend',icon);
    button.Description = 'Toggle legend display';
    addlistener(button, 'ValueChanged', @(h,e)legend('toggle'));
    column1.add(button);
     
    column2 = section2.addColumn();
    imagefile = fullfile(matlabroot,'toolbox','matlab','icons','tool_colorbar.png');
    jIcon = javax.swing.ImageIcon(imagefile); % Java ImageIcon from file (inc. GIF)
    %jIcon = javax.swing.ImageIcon(jIcon.getImage.getScaledInstance(24,24,jIcon.getImage.SCALE_SMOOTH))  % Resize icon to 24x24
    icon = Icon(jIcon);
    button = ToggleButton('Colorbar',icon);
    button.Description = 'Toggle colorbar display';
    button.ValueChangedFcn = @toggleColorbar;
    column2.addEmptyControl();
    column2.add(button);
    column2.addEmptyControl();
    function toggleColorbar(hAction,hEventData)
        if hAction.Selected
            colorbar;
        else
            colorbar('off');
        end
    end
    Checkboxes section (1 column 150px-wide), placed after the push-buttons section
    section3 = Section('Checkboxes');
    section3.CollapsePriority = 1;
    hTab.add(section3, 2);
     
    column3 = section3.addColumn('HorizontalAlignment','left', 'Width',150);
     
    button = CheckBox('Axes borders', true);
    button.ValueChangedFcn = @toggleAxes;
    button.Description = 'Axes borders';
    column3.add(button);
    function toggleAxes(hAction,~)
        if hAction.Value
            set(gca,'Visible','on');
        else
            set(gca,'Visible','off');
        end
    end
     
    button = CheckBox('Log scaling', false);
    button.addlistener('ValueChanged',@toggleLogY);
    button.Description = 'Log scaling';
    column3.add(button);
    function toggleLogY(hAction,~)
        if hAction.Value, type = 'log'; else, type = 'linear'; end
        set(gca, 'XScale',type, 'YScale',type, 'ZScale',type);
    end
     
    button = CheckBox('Inverted Y', false);
    button.addlistener('ValueChanged',@toggleInvY);
    button.Description = 'Invert Y axis';
    column3.add(button);
    function toggleInvY(hAction,~)
        if hAction.Value, type = 'reverse'; else, type = 'normal'; end
        set(gca, 'YDir',type);
    end

    Summary

    Creating a custom app toolstrip requires careful planning of the tabs, sections, controls and their layout, as well as preparation of the icons, labels and callbacks. Once you start playing with the toolstrip API, you’ll see that it’s quite easy to understand and to use. I think MathWorks did a good job in general with this API, and it’s a pity that they did not make it public or official long ago (the MCOS API discussed above existed since 2014-2015; earlier versions existed at least as far back as 2011). Comparing the changes made in the API between R2018a and R2018b shows quite minor differences, which may possibly means that the API is now considered stable, and therefore that it might well be made public in some near-term future. Still, note that this API may well change in future releases (for example, naming of the control properties that I mentioned above). It works well in R2018b, as well as in the past several Matlab releases, but this could well change in the future, so beware.

    In the following posts I will discuss advanced control customizations (icons, callbacks, collapsibility etc.), complex controls (drop-downs, pop-ups, lists, button groups, items gallery etc.) and low-level toolstrip creation and customization. As I said above, Matlab toolstrips are quite an extensive subject and so I plan to proceed slowly, with each post building on its predecessors. Stay tuned!

    In the meantime, if you would like me to assist you in building a custom toolstrip or GUI for your Matlab program, please let me know.

    Matlab toolstrip – part 4 (control customization)

    $
    0
    0

    In a previous post I showed how we can create custom Matlab app toolstrips. Toolstrips can be a bit complex to develop so I’m trying to proceed slowly, with each post in the miniseries building on the previous posts. I encourage you to review the earlier posts in the Toolstrip miniseries before reading this post. In today’s post we continue the discussion of the toolstrip created in the previous post:

    Toolstrip example (basic controls)

    Toolstrip example (basic controls)

    Today’s post will show how to attach user-defined functionality to toolstrip components, as well as some additional customizations. At the end of today’s article, you should be able to create a fully-functional custom Matlab toolstrip. Today’s post will remain within the confines of a Matlab “app”, i.e. a tool-group that displays docked figures. Future posts will discuss lower-level toolstrip mechanisms, that enable advanced customizations as well as integration in legacy (Java-based, even GUIDE-created) Matlab figures.

    Control callbacks

    Controls are useless without settable callbacks that affect the program state based on user interactions. There are two different mechanisms for setting callbacks for Matlab toolstrip controls. Refer to the example in the previous post:

    1. Setting the control’s callback property or properties – the property names differ across components (no, for some reason it’s never as simple as Callback in standard uicontrols). For example, the main action callback for push-buttons is ButtonPushedFcn, for toggle-buttons and checkboxes it’s ValueChangedFcn and for listboxes it’s . Setting the callback is relatively easy:
      hColorbar.ValueChangedFcn = @toggleColorbar;
       
      function toggleColorbar(hAction,hEventData)
          if hAction.Selected
              colorbar;
          else
              colorbar('off');
          end
      end

      The hAction object that is passed to the callback function as the first input arg contains various fields of interest, but for some reason the most important object property (Value) is renamed as the Selected property (most confusing). Also, a back-reference to the originating control (hColorbar in this example), which is important for many callbacks, is also missing (and no – I couldn’t find it in the hidden properties either):

      >> hAction
      hAction = 
        Action with properties:
       
                  Description: 'Toggle colorbar display'
                      Enabled: 1
                     Shortcut: ''
                     Selected: 1
              QuickAccessIcon: []
          SelectionChangedFcn: @toggleColorbar
                         Text: 'Colorbar'
              IsInQuickAccess: 0
                  ButtonGroup: []
                         Icon: [1×1 matlab.ui.internal.toolstrip.Icon]
       
      >> hEventData
      hEventData = 
        ToolstripEventData with properties:
       
          EventData: [1×1 struct]
             Source: [0×0 handle]
          EventName: ''
       
      >> hEventData.EventData
      ans = 
        struct with fields:
       
          Property: 'Value'
          NewValue: 1
          OldValue: 0

      Note that hEventData.Source is an empty handle for some unknown reason.

      The bottom line is that to reference the button state using this callback mechanism we need to either:

      1. Access hAction‘s Selected property which stands-in for the originating control’s Value property (this is what I have shown in the short code snippet above)
      2. Access hEventData.EventData and use its reported Property, NewValue and OldValue fields
      3. Pass the originating control handle as an extra (3rd) input arg to the callback function, and then access it from within the callback. For example:
        hColorbar.ValueChangedFcn = {@toggleColorbar, hColorbar};
         
        function toggleColorbar(hAction,hEventData,hButton)
            if hButton.Value %hAction.Selected
                colorbar;
            else
                colorbar('off');
            end
        end
    2. As an alternative, we can use the addlistener function to attach a callback to control events. Practically all toolstrip components expose public events that can be listened-to using this mechanism. In most cases the control’s callback property name(s) closely follow the corresponding events. For example, for buttons we have the ValueChanged event that corresponds to the ValueChangedFcn property. We can use listeners as follows:
      hCheckbox.addlistener('ValueChanged',@toggleLogY);
       
      function toggleLogY(hCheckbox,hEventData)
          if hCheckbox.Value, type = 'log'; else, type = 'linear'; end
          set(gca, 'XScale',type, 'YScale',type, 'ZScale',type);
      end

      Note that when we use the addlistener mechanism to attach callbacks, we don’t need any of the tricks above – we get the originating control handle as the callback function’s first input arg, and we can access it directly.

      Unfortunately, we cannot pass extra args to the callback that we specify using addlistener (this seems like a trivial and natural thing to have, for MathWorks’ attention…). In other words, addlistener only accepts a function handle as callback, not a cell array. To bypass this limitation in uicontrols, we typically add the extra parameters to the control’s UserData or ApplicationData properties (the latter via the setappdata function). But alas – toolstrip components have neither of these properties, nor can we add them in runtime (as with for other GUI controls). So we need to find some other way to pass these extra values, such as using global variables, or making the callback function nested so that it could access the parent function’s workspace.

    Additional component properties

    Component text labels, where relevant, can be set using the component’s Text property, and the tooltip can be set via the Description property. As I noted in my previous post, I believe that this is an unfortunate choice of property names. In addition, components have control-specific properties such as Value (checkboxes and toggle buttons). These properties can generally be modified in runtime, in order to reflect the program state. For example, we can disable/enable controls, and modify their label, tooltip and state depending on the control’s new state and the program state in general.

    The component icon can be set via the Icon property, where available (for example, buttons have an icon, but checkboxes do not). There are several different ways in which we can set this Icon. I will discuss this in detail in the following post; in the meantime you can review the usage examples in the previous post.

    There are a couple of additional hidden component properties that seem promising, most notably Shortcut and Mnemonic (the latter (Mnemonic) is also available in Section and Tab, not just in components). Unfortunately, at least as of R2018b these properties do not seem to be connected yet to any functionality. In the future, I would expect them to correspond to keyboard shortcuts and underlined mnemonic characters, as these functionalities behave in standard menu items.

    Accessing the underlying Java control

    As long as we’re not displaying the toolstrip on a browser page (i.e., inside a uifigure or Matlab Online), the toolstrip is basically composed of Java Swing components from the com.mathworks.toolstrip.components package (such as TSButton or TSCheckBox). I will discuss these Java classes and their customizations in a later post, but for now I just wish to show how to access the underlying Java component of any Matlab MCOS control. This can be done using a central registry of toolstrip components (so-called “widgets”), which is accessible via the ToolGroup‘s hidden ToolstripSwingService property, and then via each component’s hidden widget Id. For example:

    >> widgetRegistry = hToolGroup.ToolstripSwingService.Registry;
    >> jButton = widgetRegistry.getWidgetById(hButton.getId)  % get the hButton's underlying Java control
    ans =
    com.mathworks.toolstrip.components.TSToggleButton[,"Colorbar",layout<>,NORMAL]

    We can now apply a wide variety of Java-based customizations to the retrieved jButton, as I have shown in many other articles on this website over the past decade.

    Another way to access the toolstrip Java component hierarchy is via hToolGroup.Peer.get(tabIndex).getComponent. This returns the top-level Java control representing the tab whose index in tabIndex (0=left-most tab):

    >> jToolGroup = hToolGroup.Peer;  % or: =hToolGroup.ToolstripSwingService.SwingToolGroup;
    >> jDataTab = jToolGroup.get(0).getComponent;  % Get tab #0 (first tab: "Data")
    >> jDataTab.list   % The following is abridged for brevity
    com.mathworks.toolstrip.impl.ToolstripTabContentPanel[tab0069230a-52b0-4973-b025-2171cd96301b,0,0,831x93,...]
     SectionWrapper(section54fb084c-934d-4d31-9468-7e4d66cd85e5)
      com.mathworks.toolstrip.impl.ToolstripSectionComponentWithHeader[,0,0,241x92,...]
       com.mathworks.toolstrip.components.TSPanel[section54fb084c-934d-4d31-9468-7e4d66cd85e5,,layout<HORIZONTAL>,NORMAL]
        TSColumn -> layout<> :
         com.mathworks.toolstrip.components.TSButton[,"Refresh all",layout<>,NORMAL]
        TSColumn -> layout<> :
         com.mathworks.toolstrip.components.TSButton[,"Refresh X,Y",layout<>,NORMAL]
         com.mathworks.toolstrip.components.TSButton[,"Refresh Y,Z",layout<>,NORMAL]
        TSColumn -> layout<> :
         com.mathworks.toolstrip.components.TSButton[,"Refresh X",layout<>,NORMAL]
         com.mathworks.toolstrip.components.TSButton[,"Refresh Y",layout<>,NORMAL]
         com.mathworks.toolstrip.components.TSButton[,"Refresh Z",layout<>,NORMAL]
     SectionWrapper(sectionebd8ab95-fd33-4a3d-8f24-152589713994)
      com.mathworks.toolstrip.impl.ToolstripSectionComponentWithHeader[,0,0,159x92,...]
       com.mathworks.toolstrip.components.TSPanel[sectionebd8ab95-fd33-4a3d-8f24-152589713994,,layout<HORIZONTAL>,NORMAL]
        TSColumn -> layout<> :
         com.mathworks.toolstrip.components.TSCheckBox[,"Axes borders",layout<>,NORMAL]
         com.mathworks.toolstrip.components.TSCheckBox[,"Log scaling",layout<>,NORMAL]
         com.mathworks.toolstrip.components.TSCheckBox[,"Inverted Y",layout<>,NORMAL]
     SectionWrapper(section01995bfd-61de-490f-aa22-de50bae1af75)
      com.mathworks.toolstrip.impl.ToolstripSectionComponentWithHeader[,0,0,125x92,...]
       com.mathworks.toolstrip.components.TSPanel[section01995bfd-61de-490f-aa22-de50bae1af75,,layout<HORIZONTAL>,NORMAL]
        TSColumn -> layout<> :
         com.mathworks.toolstrip.components.TSToggleButton[,"Legend",layout<>,NORMAL]
        TSColumn -> layout<> :
         com.mathworks.toolstrip.components.TSLabel[null," ",layout<>,NORMAL]
         com.mathworks.toolstrip.components.TSToggleButton[,"Colorbar",layout<>,NORMAL]
         com.mathworks.toolstrip.components.TSLabel[null," ",layout<>,NORMAL]
     com.mathworks.mwswing.MJButton[toolstrip.header.collapseButton,808,70,20x20,...]

    Toolstrip miniseries roadmap

    The next post will discuss icons, for both toolstrip controls as well as the ToolGroup app window.

    I plan to discuss complex components in subsequent posts. Such components include button-group, drop-down, listbox, split-button, slider, popup form, gallery etc.

    Following that, my plan is to discuss toolstrip collapsibility, the ToolPack framework, docking layout, DataBrowser panel, QAB (Quick Access Bar), underlying Java controls, and adding toolstrips to figures – not necessarily in this order.

    Have I already mentioned that Matlab toolstrips can be a bit complex?

    If you would like me to assist you in building a custom toolstrip or GUI for your Matlab program, please let me know.
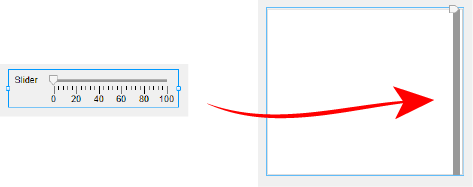
    Happy New Year, everyone!

    Matlab toolstrip – part 5 (icons)

    $
    0
    0

    In a previous post I showed how we can create custom Matlab app toolstrips. Toolstrips can be a bit complex to develop so I’m trying to proceed slowly, with each post in the miniseries building on the previous posts. I encourage you to review the earlier posts in the Toolstrip miniseries before reading this post. Today’s post describes how we can set various icons, based on the toolstrip created in the previous posts:

    Toolstrip example (basic controls)

    Toolstrip example (basic controls)


    Component icons

    Many toolstrip controls (such as buttons, but not checkboxes for example) have a settable Icon property. The standard practice is to use a 16×16 icon for a component within a multi-component toolstrip column (i.e., when 2 or 3 components are displayed on top of each other), and a 24×24 icon for a component that spans the entire column height (i.e., when the column contains only a single component).

    We can use one of the following methods to specify the icon. Note that you need to import matlab.ui.internal.toolstrip.* if you wish to use the Icon class without the preceding package name.

    • The Icon property value is typically empty ([]) by default, meaning that no icon is displayed.
       
    • We can use one of ~150 standard icons using the format Icon.<icon-name>. For example: icon = Icon.REFRESH_24. These icons typically come in 2 sizes: 16×16 pixels (e.g. Icon.REFRESH_16) that we can use with the small-size components (which are displayed when the column has 2-3 controls), and 24×24 pixels (e.g. REFRESH_24) that we can use with the large-size components (which are displayed when the column contains only a single control). You can see the list of the standard icons by running
      matlab.ui.internal.toolstrip.Icon.showStandardIcons

      Standard toolstrip control Icons
    • We can use the Icon constructor by specifying the full filepath for any PNG or JPG image file. Note that other file type (such as GIF) are not supported by this method. For example:
      icon = Icon(fullfile(matlabroot,'toolbox','matlab','icons','tool_colorbar.png')); % PNG/JPG image file (not GIF!)

      In fact, the ~150 standard icons above use this mechanism under the hood: Icon.REFRESH_24 is basically a public static method of the Icon class, which simply calls Icon('REFRESH_24','Refresh_24') (note the undocumented use of a 2-input Icon constructor). This method in turn uses the Refresh_24.png file in Matlab’s standard toolstrip resources folder: %matlabroot%/toolbox/shared/controllib/general/resources/toolstrip_icons/Refresh_24.png.

    • We can also use the Icon constructor by specifying a PNG or JPG file contained within a JAR file, using the standard jar:file:...jar!/ notation. There are numerous icons included in Matlab’s JAR files – simply open these files in WinZip or WinRar and browse. In addition, you can include images included in any external JAR file. For example:
      icon = Icon(['jar:file:/' matlabroot '/java/jar/mlwidgets.jar!/com/mathworks/mlwidgets/actionbrowser/resources/uparrow.png']);
    • We can also use the Icon constructor by specifying a Java javax.swing.ImageIcon object. Fortunately we can create such objects from a variety of image formats (including GIFs). For example:
      iconFilename = fullfile(matlabroot,'toolbox','matlab','icons','boardicon.gif');
      jIcon = javax.swing.ImageIcon(iconFilename);  % Java ImageIcon from file (inc. GIF)
      icon = Icon(jIcon);

      If we need to resize the Java image (for example, from 16×16 to 24×24 or vise versa), we can use the following method:

      % Resize icon to 24x24 pixels
      jIcon = javax.swing.ImageIcon(iconFilename);  % get Java ImageIcon from file (inc. GIF)
      jIcon = javax.swing.ImageIcon(jIcon.getImage.getScaledInstance(24,24,jIcon.getImage.SCALE_SMOOTH))  % resize to 24x24
      icon = Icon(jIcon);
    • We can apparently also use a CSS class-name to load images. This is only relevant for the JavaScript-based uifigures, not legacy Java-based figures that I discussed so far. Perhaps I will explore this in some later post that will discuss toolstrip integration in uifigures.

    App window icon

    The app window’s icon can also be set. By default, the window uses the standard Matlab membrane icon (%matlabroot%/toolbox/matlab/icons/matlabicon.gif). This can be modified using the hToolGroup.setIcon method, which currently [R2018b] expects a Java ImageIcon object as input. For example:

    iconFilename = fullfile(matlabroot,'toolbox','matlab','icons','reficon.gif');
    jIcon = javax.swing.ImageIcon(iconFilename);
    hToolGroup.setIcon(jIcon)

    This icon should be set before the toolgroup window is shown (hToolGroup.open).

    Custom app window icon

    Custom app window icon

    An odd caveat here is that the icon size needs to be 16×16 – setting a larger icon results in the icon being ignored and the default Matlab membrane icon used. For example, if we try to set ‘boardicon.gif’ (16×17) instead of ‘reficon.gif’ (16×16) we’d get the default icon instead. If our icon is too large, we can resize it to 16×16, as shown above:

    % Resize icon to 16x16 pixels
    jIcon = javax.swing.ImageIcon(iconFilename);  % get Java ImageIcon from file (inc. GIF)
    jIcon = javax.swing.ImageIcon(jIcon.getImage.getScaledInstance(16,16,jIcon.getImage.SCALE_SMOOTH))  % resize to 16x16
    hToolGroup.setIcon(jIcon)

    It’s natural to expect that hToolGroup, which is a pure-Matlab MCOS wrapper class, would have an Icon property that accepts Icon objects, just like for controls as described above. For some reason, this is not the case. It’s very easy to fix it though – after all, the Icon class is little more than an MCOS wrapper class for the underlying Java ImageIcon (not exactly, but close enough). Adapting ToolGroup‘s code to accept an Icon is quite easy, and I hope that MathWorks will indeed implement this in a near-term future release. I also hope that MathWorks will remove the 16×16 limitation, or automatically resize icons to 16×16, or at the very least issue a console warning when a larger icon is specified by the user. Until then, we can use the setIcon(jImageIcon) method and take care to send it the 16×16 ImageIcon object that it expects.

    Toolstrip miniseries roadmap

    The next post will discuss complex components, including button-group, drop-down, listbox, split-button, slider, popup form, gallery etc.

    Following that, my plan is to discuss toolstrip collapsibility, the ToolPack framework, docking layout, DataBrowser panel, QAB (Quick Access Bar), underlying Java controls, and adding toolstrips to figures – not necessarily in this order. Matlab toolstrips can be a bit complex, so I plan to proceed in small steps, each post building on top of its predecessors.

    If you would like me to assist you in building a custom toolstrip or GUI for your Matlab program, please let me know.
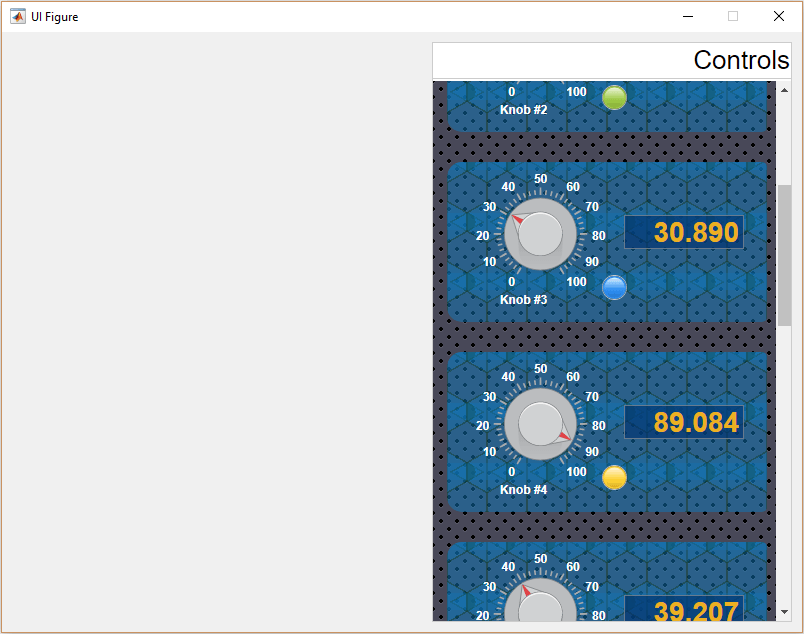
    Matlab toolstrip – part 6 (complex controls)

    $
    0
    0

    In previous posts I showed how we can create custom Matlab app toolstrips using simple controls such as buttons and checkboxes. Today I will show how we can incorporate more complex controls into our toolstrip: button groups, edit-boxes, spinners, sliders etc.

    Some custom Toolstrip Controls

    Toolstrips can be a bit complex to develop so I’m proceeding slowly, with each post in the miniseries building on the previous posts. I encourage you to review the earlier posts in the Toolstrip miniseries before reading this post.

    The first place to search for potential toostrip components/controls is in Matlab’s built-in toolstrip demos. The showcaseToolGroup demo displays a large selection of generic components grouped by function. These controls’ callbacks do little less than simply output a text message in the Matlab console. On the other hand, the showcaseMPCDesigner demo shows a working demo with controls that interact with some docked figures and their plot axes. The combination of these demos should provide plenty of ideas for your own toolstrip implementation. Their m-file source code is available in the %matlabroot%/toolbox/matlab/toolstrip/+matlab/+ui/+internal/+desktop/ folder. To see the available toolstrip controls in action and how they could be integrated, refer to the source-code of these two demos.

    All toolstrip controls are defined by classes in the %matlabroot%/toolbox/matlab/toolstrip/+matlab/+ui/+internal/+toolstrip/ folder and use the matlab.ui.internal.toolstrip package prefix, for example:

    % Alternative 1:
    hButton = matlab.ui.internal.toolstrip.Button;
     
    % Alternative 2:
    import matlab.ui.internal.toolstrip.*
    hButton = Button;

    For the remainder of today’s post it is assumed that you are using one of these two alternatives whenever you access any of the toolstrip classes.

    Top-level toolstrip controls

    ControlDescriptionImportant propertiesCallbacksEvents
    EmptyControlPlaceholder (filler) in container column(none)(none)(none)
    LabelSimple text label (no action)Icon, Text (string)(none)(none)
    ButtonPush-buttonIcon, Text (string)ButtonPushedFcnButtonPushed
    ToggleButtonToggle (on/off) buttonIcon, Text (string), Value (logical true/false), ButtonGroup (a ButtonGroup object)ValueChangedFcnValueChanged
    RadioButtonRadio-button (on/off)Text (string), Value (logical true/false), ButtonGroup (a ButtonGroup object)ValueChangedFcnValueChanged
    CheckBoxCheck-box (on/off)Text (string), Value (logical true/false)ValueChangedFcnValueChanged
    EditFieldSingle-line editboxValue (string)ValueChangedFcnValueChanged, FocusGained, FocusLost
    TextAreaMulti-line editboxValue (string)ValueChangedFcnValueChanged, FocusGained, FocusLost
    SpinnerA numerical spinner control of values between min,maxLimits ([min,max]), StepSize (integer), NumberFormat (‘integer’ or ‘double’), DecimalFormat (string), Value (numeric)ValueChangedFcnValueChanged, ValueChanging
    SliderA horizontal slider of values between min,maxLimits ([min,max]), Labels (cell-array), Ticks (integer), UseSmallFont (logical true/false, R2018b onward), ShowButton (logical true/false, undocumented), Steps (integer, undocumented), Value (numeric)ValueChangedFcnValueChanged, ValueChanging
    ListBoxList-box selector with multiple itemsItems (cell-array), SelectedIndex (integer), MultiSelect (logical true/false), Value (cell-array of strings)ValueChangedFcnValueChanged
    DropDownSingle-selection drop-down (combo-box) selectorItems (cell-array), SelectedIndex (integer), Editable (logical true/false), Value (string)ValueChangedFcnValueChanged
    DropDownButtonButton that has an associated drop-down selectorIcon, Text (string), Popup (a PopupList object)DynamicPopupFcn(none)
    SplitButtonSplit button: main clickable part next to a drop-down selectorIcon, Text (string), Popup (a PopupList object)ButtonPushedFcn, DynamicPopupFcnButtonPushed, DropDownPerformed (undocumented)
    GalleryA gallery of selectable options, displayed in-panelMinColumnCount (integer), MaxColumnCount (integer), Popup (a GalleryPopup object), TextOverlay (string)(none)(none)
    DropDownGalleryButtonA gallery of selectable options, displayed as a drop-downMinColumnCount (integer), MaxColumnCount (integer), Popup (a GalleryPopup object), TextOverlay (string)(none)(none)

    In addition to the control properties listed in the table above, all toolstrip controls share some common properties:

    • Description – a string that is shown in a tooltip when you hover the mouse over the control
    • Enabled – a logical value (default: true) that controls whether we can interact with the control. A disabled control is typically grayed-over. Note that the value is a logical true/false, not ‘on’/’off’
    • Tag – a string that can be used to uniquely identify/locate the control via their container’s find(tag) and findAll(tag) methods. Can contain spaces and special symbols – does not need to be a valid Matlab identifier
    • Children – contains a list of sub-component (if any); useful with complex controls
    • Parent – the handle of the container that contains the control
    • Type – the type of control, typically its class-name
    • Mnemonic – an undocumented string property, currently unused (?)
    • Shortcut – an undocumented string property, currently unused (?)

    The EmptyControl, Button, ToggleButton and CheckBox controls were discussed in an earlier post of this miniseries. The bottom 6 selection controls (ListBox, DropDown, DropDownButton, SplitButton, Gallery and DropDownGalleryButton) will be discussed in the next post. The rest of the controls are described below.

    Button groups

    A ButtonGroup binds several CheckBox and ToggleButton components such that only one of them is selected (pressed) at any point in time. For example:

    hSection = hTab.addSection('Radio-buttons');
    hColumn = hSection.addColumn();
     
    % Grouped RadioButton controls
    hButtonGroup = ButtonGroup;
    hRadio = RadioButton(hButtonGroup, 'Option choice #1');
    hRadio.ValueChangedFcn = @ValueChangedCallback;
    hColumn.add(hRadio);
     
    hRadio = RadioButton(hButtonGroup, 'Option choice #2');
    hRadio.ValueChangedFcn = @ValueChangedCallback;
    hRadio.Value = true;
    hColumn.add(hRadio);

    Toolstrip ButtonGroup

    Toolstrip ButtonGroup

    Note that unlike the uibuttongroup object in “standard” figure GUI, the toolstrip’s ButtonGroup object does not have a SelectionChangedFcn callback property (or corresponding event). Instead, we need to set the ValueChangedFcn callback property (or listen to the ValueChanged event) separately for each individual control. This is really a shame – I think it would make good design sense to have a SelectionChangedFcn callback at the ButtonGroup level, as we do for uibuttongroup (in addition to the individual control callbacks).

    Also note that the internal documentation of ButtonGroup has an error – it provides an example usage with RadioButton that has its constructor inputs switched: the correct constructor is RadioButton(hButtonGroup,labelStr). On the other hand, for ToggleButton, the hButtonGroup input is the [optional] 3rd input arg of the constructor: ToggleButton(labelStr,Icon,hButtonGroup). I think that it would make much more sense for the RadioButton constructor to follow the documentation and the style of ToggleButton and make the hButtonGroup input the last (2nd, optional) input arg, rather than the 1st. In other words, it would make more sense for RadioButton(labelStr,hButtonGroup), but unfortunately this is currently not the case.

    Label, EditField and TextArea

    A Label control is a simple non-clickable text label with an optional Icon, whose text is controlled via the Text property. The label’s alignment is controlled by the containing column’s HorizontalAlignment property.

    An EditField is a single-line edit-box. Its string contents can be fetched/updated via the Value property, and when the user updates the edit-box contents the ValueChangedFcn callback is invoked (upon each modification of the string, i.e. every key-click). This is a pretty simple control actually.

    The EditField control has a hidden (undocumentented) settable property called PlaceholderText, which presumably aught to display a gray initial prompt within the editbox. However, as far as I could see this property has no effect (perhaps, as the name implies, it is a place-holder for a future functionality…).

    A TextArea is another edit-box control, but enables entering multiple lines of text, unlike EditField which is a single-line edit-box. TextArea too is a very simple control, having a settable Value string property and a ValueChangedFcn callback. Whereas EditField controls, being single-line, would typically be included in 2- or 3-element toolstrip columns, the TextArea would typically be placed in a single-element column, so that it would span the entire column height.

    A peculiarity of toolstrip columns is that unless you specify their Width property, the internal controls are displayed with a minimal width (the width is only controllable at the column level, not the control-level). This is especially important with EditField and TextArea controls, which are often empty by default, causing their assigned width to be minimal (only a few pixels). This is corrected by setting their containing column’s Width:

    % EditField controls
    column1 = hSection.addColumn('HorizontalAlignment','right');
    column1.add(Label('Yaba:'))
    column1.add(Label('Daba doo:'))
     
    column2 = hSection.addColumn('Width',70);
    column2.add(EditField);
    column2.add(EditField('Initial text'));
     
    % TextArea control
    column3 = hSection.addColumn('Width',90);
    hEdit = TextArea;
    hEdit.ValueChangedFcn = @ValueChangedCallback;
    column3.add(hEdit);

    Toolstrip Label, EditField and TextArea

    Toolstrip Label, EditField and TextArea

    Spinner

    Spinner is a single-line numeric editbox that has an attached side-widget where you can increase/decrease the editbox value by a specified amount, subject to predefined min/max values. If you try to enter an illegal value, Matlab will beep and the editbox will revert to its last acceptable value. You can only specify a NumberFormat of ‘integer’ or ‘double’ (default: ‘integer’) and a DecimalFormat which is a string composed of the number of sub-decimal digits to display and the format (‘e’ or ‘f’). For example, DecimalFormat=’4f’ will display 4 digits after the decimal in floating-point format (‘e’ means engineering format). Here is a short usage example (notice the different ways that we can set the callbacks):

    hColumn = hSection.addColumn('Width',100);
     
    % Integer spinner (-100 : 10 : 100)
    hSpinner = Spinner([-100 100], 0);  % [min,max], initialValue
    hSpinner.Description = 'this is a tooltip description';
    hSpinner.StepSize = 10;
    hSpinner.ValueChangedFcn = @ValueChangedCallback;
    hColumn.add(hSpinner);
     
    % Floating-point spinner (-10 : 0.0001 : 10)
    hSpinner = Spinner([-10 10], pi);  % [min,max], initialValue
    hSpinner.NumberFormat = 'double';
    hSpinner.DecimalFormat = '4f';
    hSpinner.StepSize = 1e-4;
    addlistener(hSpinner,'ValueChanged', @ValueChangedCallback);
    addlistener(hSpinner,'ValueChanging',@ValueChangingCallback);
    hColumn.add(hSpinner);

    Toolstrip Spinner

    Toolstrip Spinner

    A logical extension of the toolstrip spinner implementation would be for non-numeric spinners, as well as custom Value display formatting. Perhaps this will become available at some future Matlab release.

    Slider

    Slider is a horizontal ruler on which you can move a knob from the left (min Value) to the right (max Value). The ticks and labels are optional and customizable. Here is a simple example showing a plain slider (values between 0-100, initial value 70, ticks every 5, labels every 20, step size 1), followed by a custom slider (notice again the different ways that we can set the callbacks):

    hColumn = hSection.addColumn('Width',200);
     
    hSlider = Slider([0 100], 70);  % [min,max], initialValue
    hSlider.Description = 'this is a tooltip';
    tickVals = 0 : 20 : 100;
    hSlider.Labels = [compose('%d',tickVals); num2cell(tickVals)]';  % {'0',0; '20',20; ...}
    hSlider.Ticks = 21;  % =numel(0:5:100)
    hSlider.ValueChangedFcn = @ValueChangedCallback;
    hColumn.add(hSlider);
     
    hSlider = Slider([0 100], 40);  % [min,max], initialValue
    hSlider.Labels = {'Stop' 0; 'Slow' 20; 'Fast' 50; 'Too fast' 75; 'Crash!' 100};
    try hSlider.UseSmallFont = true; catch, end  % UseSmallFont was only added in R2018b
    hSlider.Ticks = 11;  % =numel(0:10:100)
    addlistener(hSlider,'ValueChanged', @ValueChangedCallback);
    addlistener(hSlider,'ValueChanging',@ValueChangingCallback);
    hColumn.add(hSlider);

    Toolstrip Slider

    Toolstrip Slider

    Toolstrip miniseries roadmap

    The next post will discuss complex selection components, including listbox, drop-down, split-button, and gallery.

    Following that, I plan to discuss toolstrip collapsibility, the ToolPack framework, docking layout, DataBrowser panel, QAB (Quick Access Bar), underlying Java controls, and adding toolstrips to figures – not necessarily in this order.
    Matlab toolstrips can be a bit complex, so I plan to proceed in small steps, each post building on top of its predecessors.

    If you would like me to assist you in building a custom toolstrip or GUI for your Matlab program, please let me know.
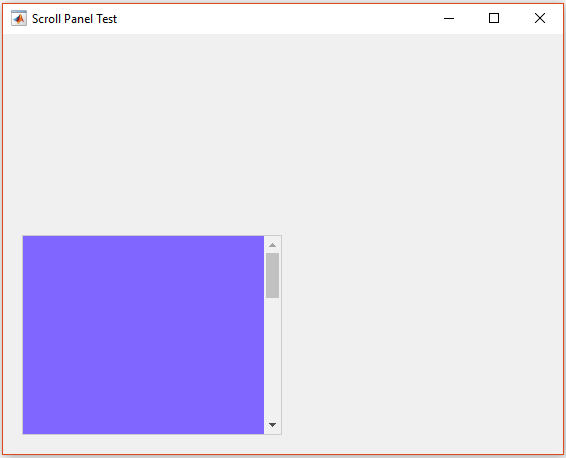
    Matlab toolstrip – part 7 (selection controls)

    $
    0
    0

    In previous posts I showed how we can create custom Matlab app toolstrips using controls such as buttons, checkboxes, sliders and spinners. Today I will show how we can incorporate even more complex selection controls into our toolstrip: lists, drop-downs, popups etc.

    Toolstrip SplitButton with dynamic popup and static sub-menu

    Toolstrip SplitButton with dynamic popup and static sub-menu

    Toolstrips can be a bit complex to develop so I’m proceeding slowly, with each post in the miniseries building on the previous posts. I encourage you to review the earlier posts in the Toolstrip miniseries before reading this post.

    Also, remember to add the following code snippet at the beginning of your code so that the relevant toolstrip classes will be recognized by Matlab:

    import matlab.ui.internal.toolstrip.*

    There are 4 types of popups in toolstrip controls:

    1. Builtin dropdown (combo-box) selector similar to the familiar uicontrol(‘style’,’popup’,…). In toolstrips, this is implemented using the DropDown control.
    2. A more complex dropdown selector having icons and tooltips, implemented using the DropDownButton and SplitButton toolstrip controls.
    3. An even-more complex drop-down selector, which presents a gallery of options. This will be discussed in detail in the next post.
    4. A fully-customizable form panel (“popup form”). This will be discussed separately, in the following post.

    The simple DropDown toolstrip control is very easy to set up and use:

    hPopup = DropDown({'Label1';'Label2';'Label3'});
    hPopup.Value = 'Label3';
    hPopup.ValueChangedFcn = @ValueChangedCallback;

    Toolstrip DropDown

    Toolstrip DropDown

    Note that the drop-down items (labels) need to be specified as a column cell-array (i.e. {a;b;c}) – a row cell-array ({a,b,c}) will result in run-time error.

    We can have the control hold a different value for each of the displayed labels, by specifying the input items as an Nx2 cell-array:

    items = {'One',   'Label1'; ...
             'Two',   'Label2'; ...
             'Three', 'Label3'}
    hPopup = DropDown(items);
    hPopup.Value = 'Two';
    hPopup.ValueChangedFcn = @ValueChangedCallback;

    This drop-down control will display the labels “Label1”, “Label2” (initially selected), and “Label3”. Whenever the selected drop-down item is changed, the corresponding popup Value will change to the corresponding value. For example, when “Label3” is selected in the drop-down, hPopup.Value will change to ‘Three’.

    Another useful feature of the toolstrip DropDown control is the Editable property (logical true/false, default=false), which enables the user to modify the entry in the drop-down’s editbox. Any custom text entered within the editbox will update the control’s Value property to that string.

    ListBox

    We can create a ListBox in a very similarly manner to DropDown. For example, the following code snippet creates a list-box that spans the entire toolstrip column height and has 2 of its items initially selected:

    hColumn = hSection.addColumn('Width',100);
    allowMultiSelection = true;
    items = {'One','Label1'; 'Two','Label2'; 'Three','Label3'; 'Four','Label4'; 'Five','Label5'};
    hListBox = ListBox(items, allowMultiSelection);
    hListBox.Value = {'One'; 'Three'};
    hListBox.ValueChangedFcn = @ValueChangedCallback;
    hColumn.add(hListBox);

    Toolstrip ListBox (multi-selection)

    Toolstrip ListBox (multi-selection)

    The DropDown and ListBox controls are nearly identical in terms of their properties, methods and events/callbacks, with the following notable exceptions:

    • ListBox controls do not have an Editable property
    • ListBox controls have a MultiSelect property (logical, default=false), which DropDowns do not have. Note that this property can only be set during the ListBox‘s creation, as shown in the code snippet above.

    DropDownButton and SplitButton

    A more elaborate drop-down selector can be created using the DropDownButton and SplitButton toolstrip controls. For such controls, we create a PopupList object, and add elements to it, which could be any of the following, in whichever order that you wish:

    1. PopupListHeader – a section header (title), non-selectable
    2. ListItem – a selectable list item, with optional Icon, Text, and Description (tooltip string, which for some reason [probably a bug] is not actually shown). For some reason (perhaps a bug), the Description is not shown in a tooltip (no tooltip is displayed). However, it is displayed as a label beneath the list-item’s main label, unless we set ShowDescription to false.
    3. ListItemWithCheckBox – a selectable list item that toggles a checkmark icon based on the list item’s selection Value (on/off). The checkmark icon is not customizable (alas).
    4. ListItemWithPopup – a non-selectable list item, that displays a sub-menu (another PopupList that should be set to the parent list-item’s Popup property).

    A simple usage example (adapted from the showcaseToolGroup demo):

    Toolstrip PopupList

    Toolstrip PopupList

    function hPopup = createPopup()
     
        import matlab.ui.internal.toolstrip.*
        hPopup = PopupList();
     
        % list header #1
        header = PopupListHeader('List Items');
        hPopup.add(header);
     
        % list item #1
        item = ListItem('This is item 1', Icon.MATLAB_16);
        item.Description = 'this is the description for item #1';
        item.ShowDescription = true;
        item.ItemPushedFcn = @ActionPerformedCallback;
        hPopup.add(item);
     
        % list item #2
        item = ListItem('This is item 2', Icon.SIMULINK_16);
        item.Description = 'this is the description for item #2';
        item.ShowDescription = false;
        addlistener(item, 'ItemPushed', @ActionPerformedCallback);
        hPopup.add(item);
     
        % list header #2
        header = PopupListHeader('List Item with Checkboxes');
        hPopup.add(header);
     
        % list item with checkbox
        item = ListItemWithCheckBox('This is item 3', true);
        item.ValueChangedFcn = @PropertyChangedCallback;
        hPopup.add(item);
     
        % list item with popup
        item = ListItemWithPopup('This is item 4',Icon.ADD_16);
        item.ShowDescription = false;
        hPopup.add(item);
     
        % Sub-popup
        hSubPopup = PopupList();
        item.Popup = hSubPopup;
        % sub list item #1
        sub_item1 = ListItem('This is sub item 1', Icon.MATLAB_16);
        sub_item1.ShowDescription = false;
        sub_item1.ItemPushedFcn = @ActionPerformedCallback;
        hSubPopup.add(sub_item1);
        % sub list item #2
        sub_item2 = ListItem('This is sub item 2', Icon.SIMULINK_16);
        sub_item2.ShowDescription = false;
        sub_item2.ItemPushedFcn = @ActionPerformedCallback;
        hSubPopup.add(sub_item2);
     
    end  % createPopup()

    We now have two alternatives for attaching this popup to the DropDownButton or SplitButton:

    Toolstrip SplitButton with dynamic popup and static sub-menu

    Toolstrip SplitButton with dynamic popup and static sub-menu

    • Static popup – set the Popup property of the button or ListItemWithPopup to the popup-creation function (or hPopup). The popup will be created once and will remain unchanged throughout the program execution. For example:
      hButton = DropDownButton('Vertical', Icon.OPEN_24);
      hButton.Popup = createPopup();
    • Dynamic popup – set the DynamicPopupFcn of the button or ListItemWithPopup to the popup creation function. This function will be invoked separately whenever the user clicks on the drop-down selector widget. Inside our popup-creation function we can have state-dependent code that modifies the displayed list items depending on the state of our program/environment. For example:
      hButton = SplitButton('Vertical', Icon.OPEN_24);
      hButton.ButtonPushedFcn = @ActionPerformedCallback;  % invoked when user clicks the main split-button part
      hButton.DynamicPopupFcn = @(h,e) createPopup();      % invoked when user clicks the drop-down selector widget


    DropDownButton and SplitButton are exactly the same as far as the popup-list is concerned: If it is set via the Popup property then the popup is static (in the sense that it is only evaluated once, when created), and if it is set via DynamicPopupFcn then the popup is dynamic (re-created before display). The only difference between DropDownButton and SplitButton is that in addition to the drop-down control, a SplitButton also includes a regular push-button control (with its corresponding ButtonPushedFcn callback).

    In summary:

    • If DynamicPopupFcn is set to a function handle, then the PopupList that is returned by that function will be re-evaluated and displayed whenever the user clicks the main button of a DropDownButton or the down-arrow part of a SplitButton. This happens even if the Popup property is also set i.e., DynamicPopupFcn has precedence over Popup; when both of them are set, Popup is silently ignored (it would be useful for Matlab to display a warning in such cases, hopefully in a future release).
    • If DynamicPopupFcn is not set but Popup is (to a PopupList object handle), then this PopupList will be computed only once (when first created) and then it will be displayed whenever the user clicks the main button of a DropDownButton or the down-arrow part of a SplitButton.
    • Separately from the above, if a SplitButton‘s ButtonPushedFcn property is set to a function handle, then that function will be evaluated whenever the user clicks the main button of the SplitButton. No popup is presented, unless of course the callback function displays a popup programmatically. Note that ButtonPushedFcn is a property of SplitButton; this property does not exist in a DropDownButton.

    Important note: whereas DropDown and ListBox have a ValueChangedFcn callback that is invoked whenever the drop-down/listbox Value has changed, the callback mechanism is very different with DropDownButton and SplitButton: here, each menu item has its own individual callback that is invoked when that item is selected (clicked): ItemPushedFcn for ListItem; ValueChangedFcn for ListItemWithCheckBox; and DynamicPopupFcn for ListItemWithPopup. As we shall see later, the same is true for gallery items – each item has its own separate callback.

    Galleries

    Toolstrip galleries are panels of buttons (typically large icons with an attached text label), which are grouped in “categories”.

    The general idea is to first create the GalleryPopup object, then add to it a few GalleryCategory groups, each consisting of GalleryItem (push-buttons) and/or ToggleGalleryItem (toggle-buttons) objects. Once this GalleryPopup is created, we can either integrate it in-line within the toolstrip section (using Gallery), or as a compact drop-down button (using DropDownGalleryButton):

    % Inline gallery
    section = hTab.addSection('Multiple Selection Gallery');
    column = section.addColumn();
    popup = GalleryPopup('ShowSelection',true);
    % add the GalleryPopup creation code (see next week's post)
    gallery = Gallery(popup, 'MaxColumnCount',4, 'MinColumnCount',2);
    column.add(gallery);
     
    % Drop-down gallery
    section = hTab.addSection('Drop Down Gallery');
    column = section.addColumn();
    popup = GalleryPopup();
    % add the GalleryPopup creation code (see next week's post)
    button = DropDownGalleryButton(popup, 'Examples', Icon.MATLAB_24);
    button.MinColumnCount = 5;
    column.add(button);

    Toolstrip Gallery (in-line & drop-down)

    I initially planned to include all the relevant Gallery discussion here, but it turned out to require so much space that I decided to devote a separate article for it — this will be the topic of next week’s blog post.

    Toolstrip miniseries roadmap

    The next post will discuss Galleries in depth, followed by popup forms.

    Following that, I plan to discuss toolstrip collapsibility, the ToolPack framework, docking layout, DataBrowser panel, QAB (Quick Access Bar), underlying Java controls, and adding toolstrips to figures – not necessarily in this order.
    Matlab toolstrips can be a bit complex, so I plan to proceed in small steps, each post building on top of its predecessors.

    If you would like me to assist you in building a custom toolstrip or GUI for your Matlab program, please let me know.
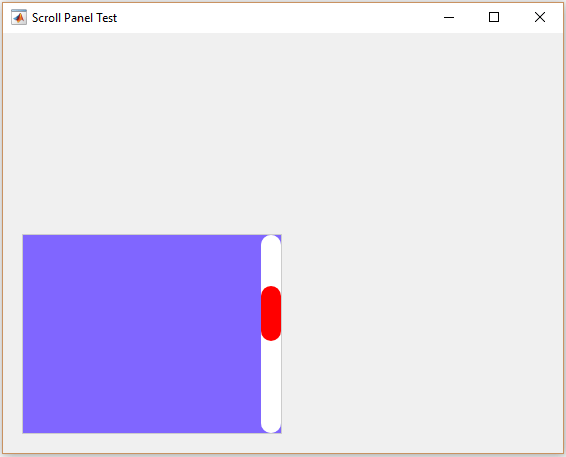
    Matlab toolstrip – part 8 (galleries)

    $
    0
    0

    In previous posts I showed how we can create custom Matlab app toolstrips using various controls (buttons, checkboxes, drop-downs, lists etc.). Today I will show how we can incorporate gallery panels into our Matlab toolstrip.

    Toolstrip Gallery (in-line & drop-down)

    Toolstrips can be a bit complex to develop so I’m proceeding slowly, with each post in the miniseries building on the previous posts. I encourage you to review the earlier posts in the Toolstrip miniseries before reading this post.

    Also, remember to add the following code snippet at the beginning of your code so that the relevant toolstrip classes will be recognized by Matlab:

    import matlab.ui.internal.toolstrip.*

    Gallery sub-components

    Toolstrip gallery popup components

    Toolstrip gallery popup components

    Toolstrip galleries are panels of buttons (typically large icons with an attached text label), which are grouped in “categories”. The gallery content can be presented either in-line within the toolstrip (a Gallery control), or as a drop-down button’s popup panel (a DropDownGalleryButton control). In either case, the displayed popup panel is a GalleryPopup object, that is composed of one or more GalleryCategory, each of which has one or more GalleryItem (push-button) and/or ToggleGalleryItem (toggle-button).
    • Gallery or DropDownGalleryButton
      • GalleryPopup
        • GalleryCategory
          • GalleryItem or ToggleGalleryItem
          • GalleryItem or ToggleGalleryItem
        • GalleryCategory

    For a demonstration of toolstrip Galleries, see the code files in %matlabroot%/toolbox/matlab/toolstrip/+matlab/+ui/+internal/+desktop/, specifically showcaseToolGroup.m and showcaseBuildTab_Gallery.m.

    GalleryPopup

    We first create the GalleryPopup object, then add to it a few GalleryCategory groups of GalleryItem, ToggleGalleryItem buttons. In the example below, we use a ButtonGroup to ensure that only a single ToggleGalleryItem button is selected:

    import matlab.ui.internal.toolstrip.*
    popup = GalleryPopup('ShowSelection',true);
     
    % Create gallery categories
    cat1 = GalleryCategory('CATEGORY #1 SINGLE'); popup.add(cat1);
    cat2 = GalleryCategory('CATEGORY #2 SINGLE'); popup.add(cat2);
    cat3 = GalleryCategory('CATEGORY #3 SINGLE'); popup.add(cat3);
     
    % Create a button-group to control item selectability
    group = matlab.ui.internal.toolstrip.ButtonGroup;
     
    % Add items to the gallery categories
    fpath = [fullfile(matlabroot,'toolbox','matlab','toolstrip','web','image') filesep];  % icons path
     
    item1 = ToggleGalleryItem('Biology', Icon([fpath 'biology_app_24.png']), group);
    item1.Description = 'Select the Biology gizmo';
    item1.ItemPushedFcn = @(x,y) ItemPushedCallback(x,y);
    cat1.add(item1);
     
    item2 = ToggleGalleryItem('Code Generation', Icon([fpath 'code_gen_app_24.png']), group);
    cat1.add(item2);
     
    item3 = ToggleGalleryItem('Control', Icon([fpath 'control_app_24.png']), group);
    cat1.add(item3);
     
    item4 = ToggleGalleryItem('Database', Icon([fpath 'database_app_24.png']), group);
    cat1.add(item4);
    ...

    Single-selection GalleryPopup (icon view)

    Single-selection GalleryPopup (icon view)

    Note that in a real-world situation, we’d assign a Description, Tag and ItemPushedFcn to all gallery items. This was elided from the code snippet above for readability, but should be part of any actual GUI. The Description only appears as tooltip popup in icon-view (shown above), but appears as a visible label in list-view (see below).

    Gallery items selection: push-button action, single-selection toggle, multiple selection toggle

    If we use ToggleGalleryItem without a ButtonGroup, multiple gallery items can be selected, rather than just a single selection as shown above:

    ...
    item1 = ToggleGalleryItem('Biology', Icon([fpath 'biology_app_24.png']));item1.Description = 'Select the Biology gizmo';
    item1.ItemPushedFcn = @(x,y) ItemPushedCallback(x,y);
    cat1.add(item1);
     
    item2 = ToggleGalleryItem('Code Generation', Icon([fpath 'code_gen_app_24.png']));cat1.add(item2);
     
    item3 = ToggleGalleryItem('Control', Icon([fpath 'control_app_24.png']));cat1.add(item3);
     
    item4 = ToggleGalleryItem('Database', Icon([fpath 'database_app_24.png']));cat1.add(item4);
    ...

    Multiple-selection GalleryPopup (icon view)

    Multiple-selection GalleryPopup (icon view)

    Alternatively, if we use GalleryItem instead of ToggleGalleryItem, the gallery items would be push-buttons rather than toggle-buttons. This enables us to present a gallery of single-action state-less push-buttons, rather than state-full toggle-buttons. The ability to customize the gallery items as either state-less push-buttons or single/multiple toggle-buttons supports a wide range of application use-cases.

    Customizing the GalleryPopup

    Properties that affect the GalleryPopup appearance are:

    • DisplayState – initial display mode of gallery items (string; default=’icon_view’, valid values: ‘icon_view’,’list_view’)
    • GalleryItemRowCount – number of rows used in the display of the in-line gallery (integer; default=1, valid values: 0,1,2). A Value of 2 should typically be used with a small icon and GalleryItemWidth (see below)
    • GalleryItemTextLineCount – number of rows used for display of the item label (integer; default=2, valid values: 0,1,2)
    • ShowSelection – whether or not to display the last-selected item (logical; default=false). Needs to be true for Gallery and false for DropDownGalleryButton.
    • GalleryItemWidth – number of pixels to allocate for each gallery item (integer, hidden; default=80)
    • FavoritesEnabled – whether or not to enable a “Favorites” category (logical, hidden; default=false)

    All of these properties are defined as private in the GalleryPopup class, and can only be specified during the class object’s construction. For example, instead of the default icon-view, we can display the gallery items as a list, by setting the GalleryPopup‘s DisplayState property to 'list_view' during construction:

    popup = GalleryPopup('DisplayState','list_view');

    GalleryPopup (list view)

    GalleryPopup (list view)


    Switching from icon-view to list-view and back can also be done by clicking the corresponding icon near the popup’s top-right corner (next to the interactive search-box).

    Now that we have prepared GalleryPopup, let’s integrate it in our toolstrip.
    We have two choices — either in-line within the toolstrip section (using Gallery), or as a compact drop-down button (using DropDownGalleryButton):

    % Inline gallery
    section = hTab.addSection('Multiple Selection Gallery');
    column = section.addColumn();
    popup = GalleryPopup('ShowSelection',true);
    % add the GalleryPopup creation code above
    gallery = Gallery(popup, 'MinColumnCount',2, 'MaxColumnCount',4);
    column.add(gallery);
     
    % Drop-down gallery
    section = hTab.addSection('Drop Down Gallery');
    column = section.addColumn();
    popup = GalleryPopup();
    % add the GalleryPopup creation code above
    button = DropDownGalleryButton(popup, 'Examples', Icon.MATLAB_24);
    button.MinColumnCount = 5;
    column.add(button);

    Toolstrip Gallery (in-line & drop-down)

    Clicking any of the drop-down (arrow) widgets will display the associated GalleryPopup.

    The Gallery and DropDownGalleryButton objects have several useful settable properties:

    • Popup – a GalleryPopup object handle, which is displayed when the user clicks the drop-down (arrow) widget. Only settable in the constructor, not after object creation.
    • MinColumnCount – minimum number of item columns to display (integer; default=1). In Gallery, this property is only settable in the constructor, not after object creation; if not enough width is available to display these columns, the control collapses into a drop-down. In DropDownGalleryButton, this property can be set even after object creation (despite incorrect internal documentation), and controls the width of the popup panel.
    • MaxColumnCount – maximal number of items columns to display (integer; default=10). In Gallery, this property is only settable in the constructor, not after object creation. In DropDownGalleryButton, this property can be set even after object creation but in any case seems to have no visible effect.
    • Description – tooltip text displayed when the mouse hovers over the Gallery area (outside the area of the internal gallery items, which have their own individual Descriptions), or over the DropDownGalleryButton control.
    • TextOverlay – a semi-transparent text label overlaid on top of the gallery panel (string, default=”). Only available in Gallery, not DropDownGalleryButton.

    For example:

    gallery = Gallery(popup, 'MinColumnCount',2, 'MaxColumnCount',4);
    gallery.TextOverlay = 'Select from these items';

    Effect of TextOverlay

    Effect of TextOverlay

    Toolstrip miniseries roadmap

    The next post will discuss popup forms. These are similar in concept to galleries, in the sense that when we click the drop-down widget a custom popup panel is displayed. In the case of a popup form, this is a fully-customizable Matlab GUI figure.

    Following that, I plan to discuss toolstrip collapsibility, the Toolpack framework, docking layout, DataBrowser panel, QAB (Quick Access Bar), underlying Java controls, and adding toolstrips to figures – not necessarily in this order.
    Matlab toolstrips can be a bit complex, so I plan to proceed in small steps, each post building on top of its predecessors.

    If you would like me to assist you in building a custom toolstrip or GUI for your Matlab program, please let me know.
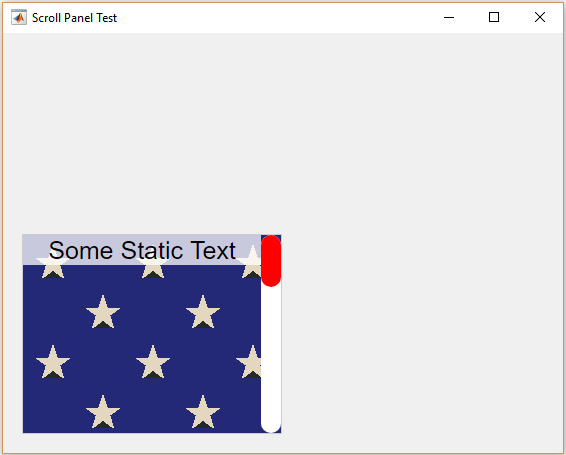
    Matlab toolstrip – part 9 (popup figures)

    $
    0
    0

    In previous posts I showed how we can create custom Matlab app toolstrips using various controls. Today I will show how we can incorporate popup forms composed of Matlab figures into our Matlab toolstrip. These are similar in concept to drop-down and gallery selectors, in the sense that when we click the toolstrip button a custom popup is displayed. In the case of a popup form, this is a fully-customizable Matlab GUI figure.

    Popup figure in Matlab toolstrip

    Toolstrips can be a bit complex to develop so I’m proceeding slowly, with each post in the miniseries building on the previous posts. I encourage you to review the earlier posts in the Toolstrip miniseries before reading this post.

    Also, remember to add the following code snippet at the beginning of your code so that the relevant toolstrip classes will be recognized by Matlab:

    import matlab.ui.internal.toolstrip.*

    Main steps and usage example

    To attach a figure popup to a toolstrip control, follow these steps:

    1. Create a new figure, using GUIDE or the figure function. The figure should typically be created modal and non-visible, unless there’s a good reason to avoid this. Note that the figure needs to be a legacy (Java-based) figure, created with GUIDE or the figure function — web-based uifigure (created with AppDesigner or the uifigure function) is not [currently] supported.
    2. Create a callback function that opens and initializes this figure, and then moves it to the expected screen location using the following syntax: hToolGroup.showFigureDialog(hFig,hAnchor), where hFig is the figure’s handle, and hAnchor is the handle for the triggering toolstrip control.
    3. Attach the callback function to the triggering toolstrip control.

    Here’s a simple usage example, in which I present a file-selector popup:

    % Create a toolstrip section, column & push-button
    hSection = hTab.addSection('Popup');
    hColumn = hSection.addColumn();
    hButton = Button('Open',Icon.OPEN_24);
    hButton.ButtonPushedFcn = {@popupFigure,hButton};  % attach popup callback to the button
    hColumn.add(hButton);
     
    % Callback function invoked when the toolstrip button is clicked
    function popupFigure(hAction, hEventData, hButton)
        % Create a new non-visible modal figure
        hFig = figure('MenuBar','none', 'ToolBar','none', 'WindowStyle','modal', ...
                      'Visible','off', 'NumberTitle','off', 'Name','Select file:');
     
        % Add interactive control(s) to the figure (in this case, a file chooser initialized to current folder)
        jFileChooser = handle(javaObjectEDT(javax.swing.JFileChooser(pwd)), 'CallbackProperties');
        [jhFileChooser, hComponent] = javacomponent(jFileChooser, [0,0,200,200], hFig);
        set(hComponent, 'Units','normalized', 'Position',[0,0,1,1]);  % resize component within containing figure
     
        % Set popup control's callback (in this case, display the selected file and close the popup)
        jhFileChooser.ActionPerformedCallback = @popupActionPerformedCallback;
        function popupActionPerformedCallback(jFileChooser, jEventData)
            fprintf('Selected file: %s\n', char(jFileChooser.getSelectedFile));
            delete(hFig);
        end
     
        % Display the popup figure onscreen, just beneath the triggering button
        hToolGroup.showFigureDialog(hFig,hButton);
     
        % Wait for the modal popup figure to close before resuming GUI interactivity
        waitfor(hFig);
    end

    This leads to the popup figure as shown in the screenshot above.

    The popup figure initially appears directly beneath the triggering button. The figure can then be moved away from that position, by dragging its title bar or border frame.

    Note how the popup is an independent heavy-weight figure window, having a border frame, title bar and a separate task-bar icon. Removing the border frame and title-bar of Matlab figures can be done using an undocumented visual illusion – this can make the popup less obtrusive, but also prevent its moving/resizing. An entirely different and probably better approach is to present a light-weight popup panel using the Toolpack framework, which I plan to discuss in the following post(s). The PopupPanel container that I discussed in another post cannot be used, because it is displayed as a sub-component of a Matlab figure, and in this case the popup is not attached to any figure (the toolstrip and ToolGroup are not Matlab figures, as explained here).

    The astute reader may wonder why I bothered going to all the trouble of displaying a modal popup with a JFileChooser, when I could have simply used the built-in uigetfile or uiputfile functions in the button’s callback. The answer is that (a) this mechanism displays the popup directly beneath the triggering button using hToolGroup.showFigureDialog(), and also (b) enables complex popups (dialogs) that have no direct builtin Matlab function (for example, a file-selector with preview, or a multi-component input form).

    Under the hood of showFigureDialog()

    How does showFigureDialog() know where to place the figure, directly beneath the triggering toolstrip anchor?

    The answer is really quite simple, if you look at this method’s source-code in %matlabroot%/toolbox/matlab/toolstrip/+matlab/+ui/+internal/+desktop/ToolGroup.m (around line 500, depending on the Matlab release).

    The function first checks whether the input hFig handle belongs to a figure or uifigure, and issues an error message in case it’s a uifigures (only legacy figures are currently supported).
    Then the function fetches the toolstrip control’s underlying Java control handle using the following code (slightly modified for clarity), as explained here:

    jAnchor = hToolGroup.ToolstripSwingService.Registry.getWidgetById(hAnchor.getId());

    Next, it uses the Java control’s getLocationOnScreen() to get the control’s onscreen position, accounting for monitor DPI variation that affects the X location.
    The figure’s OuterPosition property is then set so that the figure’s top-left corner is exactly next to the control’s bottom-left corner.
    Finally, the figure’s Visible property is set to ‘on’ to make the figure visible in its new position.

    The popup figure’s location is recomputed by showFigureDialog() whenever the toolstrip control is clicked, so the popup figure is presented in the expected position even when you move or resize the tool-group window.

    Toolstrip miniseries roadmap

    The following post(s) will present the Toolpack framework. Non-figure (lightweight) popup toolpack panels can be created, which appear more polished/stylish than the popup figures that I presented today. The drawdown is that toolpack panels may be somewhat more complex to program than figures, and IMHO are more likely to change across Matlab releases. In addition to the benefit of popup toolpack panels, toolpack presents an alternative way for toolstrip creation and customization, enabling programmers to choose between using the toolstrip framework (that I discussed so far), and the new toolpack framework.

    In a succeeding post, I’ll discuss toolstrip collapsibility, i.e. what happens when the user resizes the window, reducing the toolstrip width. Certain toolstrip controls will drop their labels, and toolstrip sections shrink into a drop-down. The priority of control/section collapsibility can be controlled, so that less-important controls will collapse before more-important ones.

    In future posts, I plan to discuss docking layout, DataBrowser panel, QAB (Quick Access Bar), underlying Java controls, and adding toolstrips to figures – not necessarily in this order.
    Matlab toolstrips can be a bit complex, so I plan to proceed in small steps, each post building on top of its predecessors.

    If you would like me to assist you in building a custom toolstrip or GUI for your Matlab program, please let me know.

    Improving graphics interactivity

    $
    0
    0

    Matlab release R2018b added the concept of axes-specific toolbars and default axes mouse interactivity. Accelerating MATLAB Performance Plain 2D plot axes have the following default interactions enabled by default: PanInteraction, ZoomInteraction, DataTipInteraction and RulerPanInteraction.

    Unfortunately, I find that while the default interactions set is much more useful than the non-interactive default axes behavior in R2018a and earlier, it could still be improved in two important ways:

    1. Performance – Matlab’s builtin Interaction objects are very inefficient. In cases of multiple overlapping axes (which is very common in multi-tab GUIs or cases of various types of axes), instead of processing events for just the top visible axes, they process all the enabled interactions for *all* axes (including non-visible ones!). This is particularly problematic with the default DataTipInteraction – it includes a Linger object whose apparent purpose is to detect when the mouse lingers for enough time on top of a chart object, and displays a data-tip in such cases. Its internal code is both inefficient and processed multiple times (for each of the axes), as can be seen via a profiling session.
    2. Usability – In my experience, RegionZoomInteraction (which enables defining a region zoom-box via click-&-drag) is usually much more useful than PanInteraction for most plot types. ZoomInteraction, which is enabled by default only enables zooming-in and -out using the mouse-wheel, which is much less useful and more cumbersome to use than RegionZoomInteraction. The panning functionality can still be accessed interactively with the mouse by dragging the X and Y rulers (ticks) to each side.

    For these reasons, I typically use the following function whenever I create new axes, to replace the default sluggish DataTipInteraction and PanInteraction with RegionZoomInteraction:

    function axDefaultCreateFcn(hAxes, ~)
        try
            hAxes.Interactions = [zoomInteraction regionZoomInteraction rulerPanInteraction];
            hAxes.Toolbar = [];
        catch
            % ignore - old Matlab release
        end
    end

    The purpose of these two axes property changes shall become apparent below.

    This function can either be called directly (axDefaultCreateFcn(hAxes), or as part of the containing figure’s creation script to ensure than any axes created in this figure has this fix applied:

    set(hFig,'defaultAxesCreateFcn',@axDefaultCreateFcn);

    Test setup

    Figure with default axes toolbar and interactivity

    Figure with default axes toolbar and interactivity

    To test the changes, let’s prepare a figure with 10 tabs, with 10 overlapping panels and a single axes in each tab:
    hFig = figure('Pos',[10,10,400,300]);
    hTabGroup = uitabgroup(hFig);
    for iTab = 1 : 10
        hTab = uitab(hTabGroup, 'title',num2str(iTab));
        hPanel = uipanel(hTab);
        for iPanel = 1 : 10
            hPanel = uipanel(hPanel);
        end
        hAxes(iTab) = axes(hPanel); %see MLint note below
        plot(hAxes(iTab),1:5,'-ob');
    end
    drawnow

    p.s. – there’s a incorrect MLint (Code Analyzer) warning in line 9 about the call to axes(hPanel) being inefficient in a loop. Apparently, MLint incorrectly parses this function call as a request to make the axes in-focus, rather than as a request to create the axes in the specified hPanel parent container. We can safely ignore this warning.

    Now let’s create a run-time test script that simulates 2000 mouse movements using java.awt.Robot:

    tic
    monitorPos = get(0,'MonitorPositions');
    y0 = monitorPos(1,4) - 200;
    robot = java.awt.Robot;
    for iEvent = 1 : 2000
        robot.mouseMove(150, y0+mod(iEvent,100));
        drawnow
    end
    toc

    This takes ~45 seconds to run on my laptop: ~23ms per mouse movement on average, with noticeable “linger” when the mouse pointer is near the plotted data line. Note that this figure is extremely simplistic – In a real-life program, the mouse events processing lag the mouse movements, making the GUI far more sluggish than the same GUI on R2018a or earlier. In fact, in one of my more complex GUIs, the entire GUI and Matlab itself came to a standstill that required killing the Matlab process, just by moving the mouse for several seconds.

    Notice that at any time, only a single axes is actually visible in our test setup. The other 9 axes are not visible although their Visible property is 'on'. Despite this, when the mouse moves within the figure, these other axes unnecessarily process the mouse events.

    Changing the default interactions

    Let’s modify the axes creation script as I mentioned above, by changing the default interactions (note the highlighted code addition):

    hFig = figure('Pos',[10,10,400,300]);
    hTabGroup = uitabgroup(hFig);
    for iTab = 1 : 10
        hTab = uitab(hTabGroup, 'title',num2str(iTab));
        hPanel = uipanel(hTab);
        for iPanel = 1 : 10
            hPanel = uipanel(hPanel);
        end
        hAxes(iTab) = axes(hPanel);
        plot(hAxes(iTab),1:5,'-ob');
        hAxes(iTab).Interactions = [zoomInteraction regionZoomInteraction rulerPanInteraction];end
    drawnow

    The test script now takes only 12 seconds to run – 4x faster than the default and yet IMHO with better interactivity (using RegionZoomInteraction).

    Effects of the axes toolbar

    The axes-specific toolbar, another innovation of R2018b, does not just have interactivity aspects, which are by themselves much-contested. A much less discussed aspect of the axes toolbar is that it degrades the overall performance of axes. The reason is that the axes toolbar’s transparency, visibility, background color and contents continuously update whenever the mouse moves within the axes area.

    Since we have set up the default interactivity to a more-usable set above, and since we can replace the axes toolbar with figure-level toolbar controls, we can simply delete the axes-level toolbars for even more-improved performance:

    hFig = figure('Pos',[10,10,400,300]);
    hTabGroup = uitabgroup(hFig);
    for iTab = 1 : 10
        hTab = uitab(hTabGroup, 'title',num2str(iTab));
        hPanel = uipanel(hTab);
        for iPanel = 1 : 10
            hPanel = uipanel(hPanel);
        end
        hAxes(iTab) = axes(hPanel);
        plot(hAxes(iTab),1:5,'-ob');
        hAxes(iTab).Interactions = [zoomInteraction regionZoomInteraction rulerPanInteraction];
        hAxes(iTab).Toolbar = [];end
    drawnow

    This brings the test script’s run-time down to 6 seconds – 7x faster than the default run-time. At ~3ms per mouse event, the GUI is now as performant and snippy as in R2018a, even with the new interactive mouse actions of R2018b active.

    Conclusions

    MathWorks definitely did not intend for this slow-down aspect, but it is an unfortunate by-product of the choice to auto-enable DataTipInteraction and of its sub-optimal implementation. Perhaps this side-effect was never noticed by MathWorks because the testing scripts probably had only a few axes in a very simple figure – in such a case the performance lags are very small and might have slipped under the radar. But I assume that many real-life complex GUIs will display significant lags in R2018b and newer Matlab releases, compared to R2018a and earlier releases. I assume that such users will be surprised/dismayed to discover that in R2018b their GUI not only interacts differently but also runs slower, although the program code has not changed.

    One of the common claims that I often hear against using undocumented Matlab features is that the program might break in some future Matlab release that would not support some of these features. But users certainly do not expect that their programs might break in new Matlab releases when they only use documented features, as in this case. IMHO, this case (and others over the years) demonstrates that using undocumented features is usually not much riskier than using the standard documented features with regards to future compatibility, making the risk/reward ratio more favorable. In fact, of the ~400 posts that I have published in the past decade (this blog is already 10 years old, time flies…), very few tips no longer work in the latest Matlab release. When such forward compatibility issues do arise, whether with fully-documented or undocumented features, we can often find workarounds as I have shown above.

    If your Matlab program could use a performance boost, I would be happy to assist making your program faster and more responsive. Don’t hesitate to reach out to me for a consulting quote.


    Viewing all 75 articles
    Browse latest View live